Setup and run your first (run) animation
Setup
Add bevy_animation_graph like you would for any rust crate to your game:
cargo add bevy_animation_graph
or add it to your Cargo.toml.
And then install the newest bevy_animation_graph_editor like this for the latest crates.io version (or use --version in order to specify the version you want e.g. the one you use in your game):
cargo install bevy_animation_graph_editor
Import your first animation
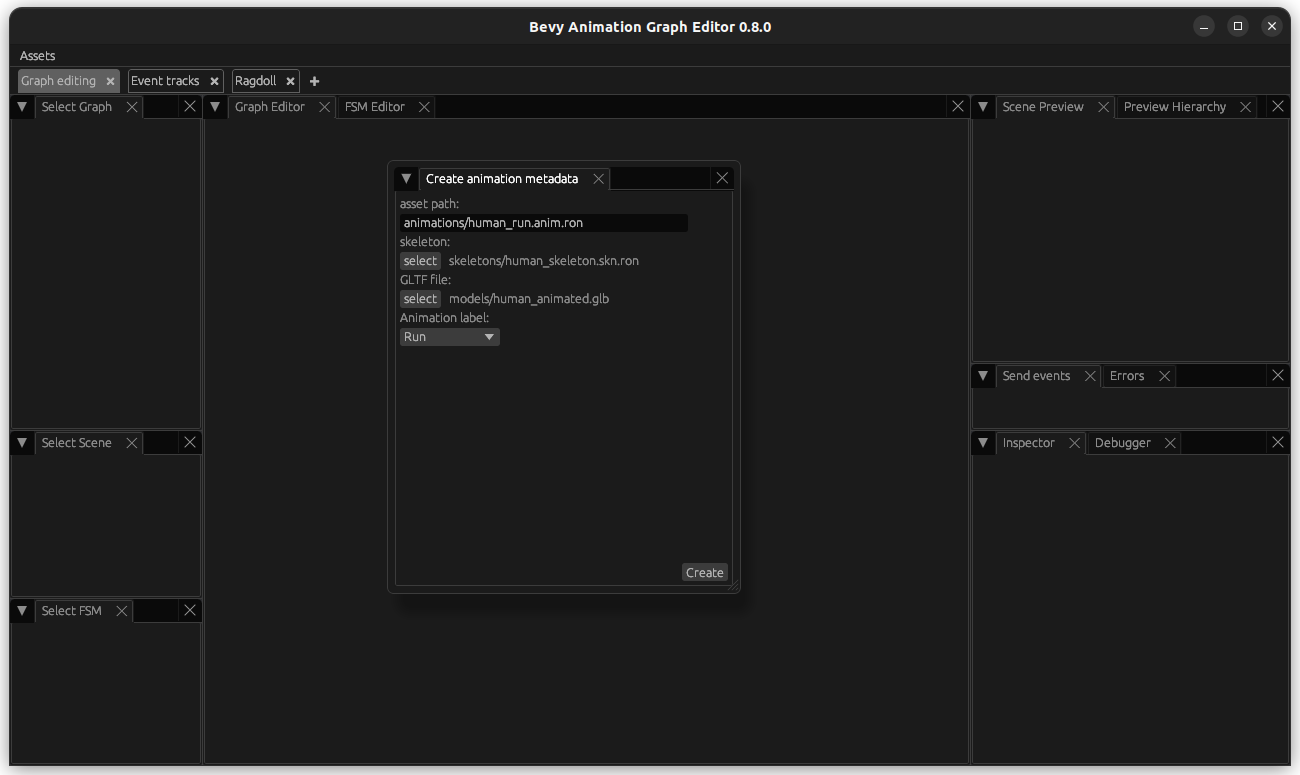
First, export your character with its animation in the .glb format from Blender or your respective modelling software. Mine is called human_animated.glb.
In my example, I only exported half of the run cycle in my animation. This will enable me to demonstrate the use of some of the nodes. Note that for this, the starting and ending frame that I exported are exactly the same pose.
Create an empty assets directory and add the following subfolders:
- animated_scenes
- animation_graphs
- animations
- models
- skeletons
NOTE: In your project, you are free to organise and name the assets folder up to your preferences. In this tutorial, I will follow the same structure as the crate examples and will describe the steps following the same organisation.
Then, let's start the animation graph editor pointing to our assets directory:
bevy_animation_graph_editor -a <PATH_TO_ASSETS_DIRECTORY>
Let's create a skeleton asset using the Assets (top left) -> Create -> Skeletons button:
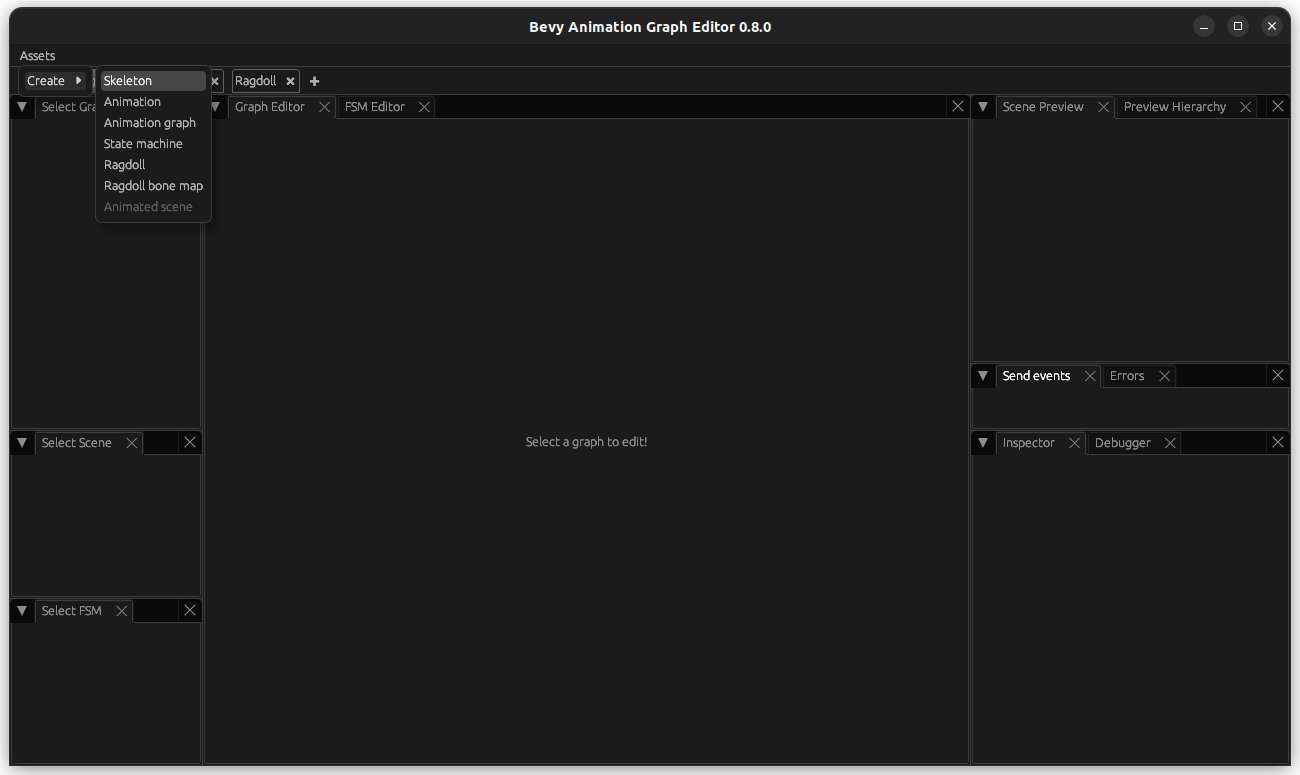

Let's also create an animation asset using the Assets (top left) -> Create -> Animations button:
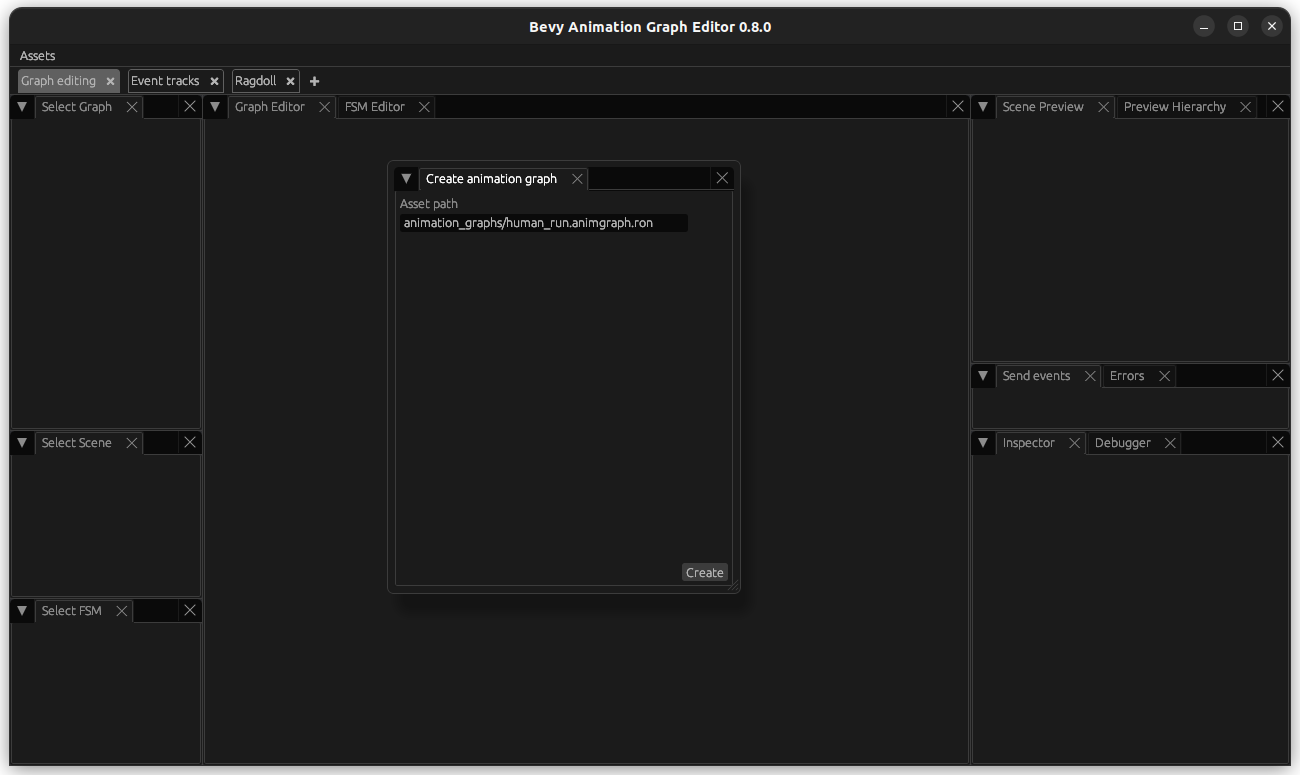
Finally, create an animation graph using the Assets (top left) -> Create -> Animation Graph button:
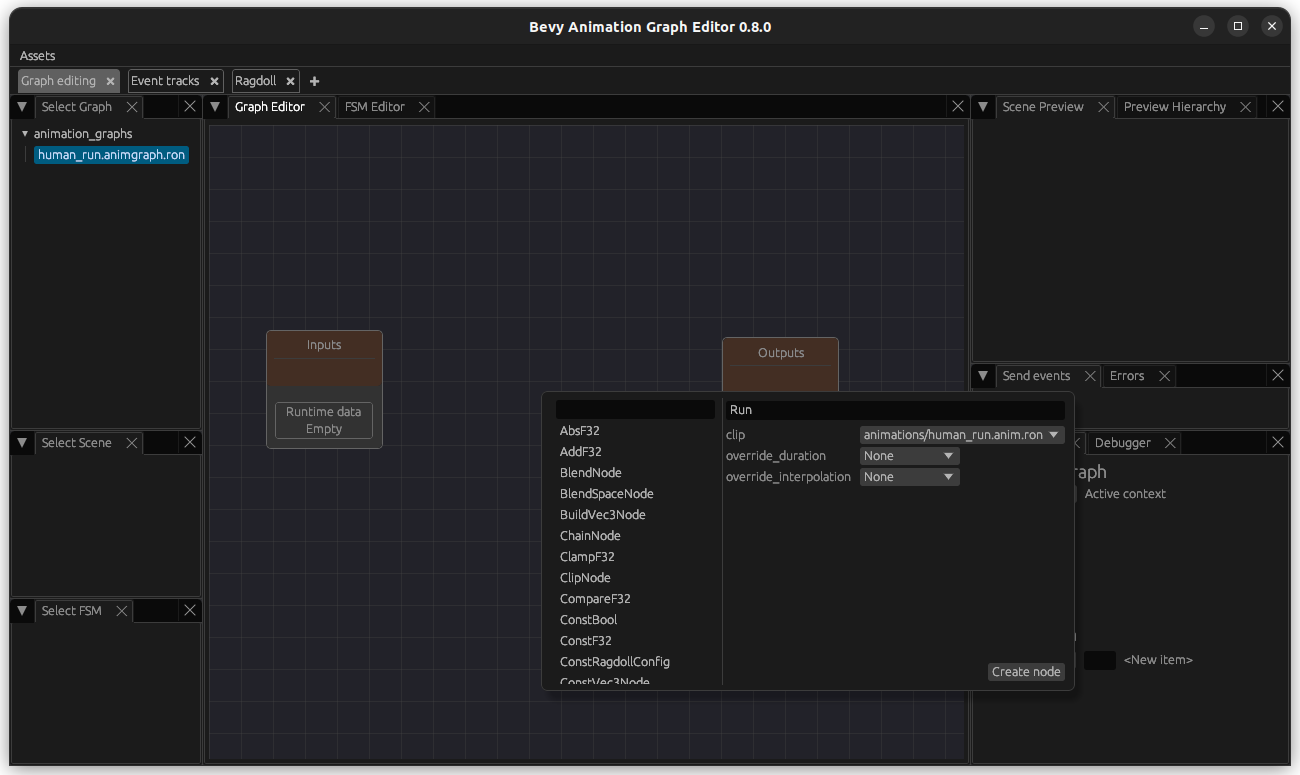
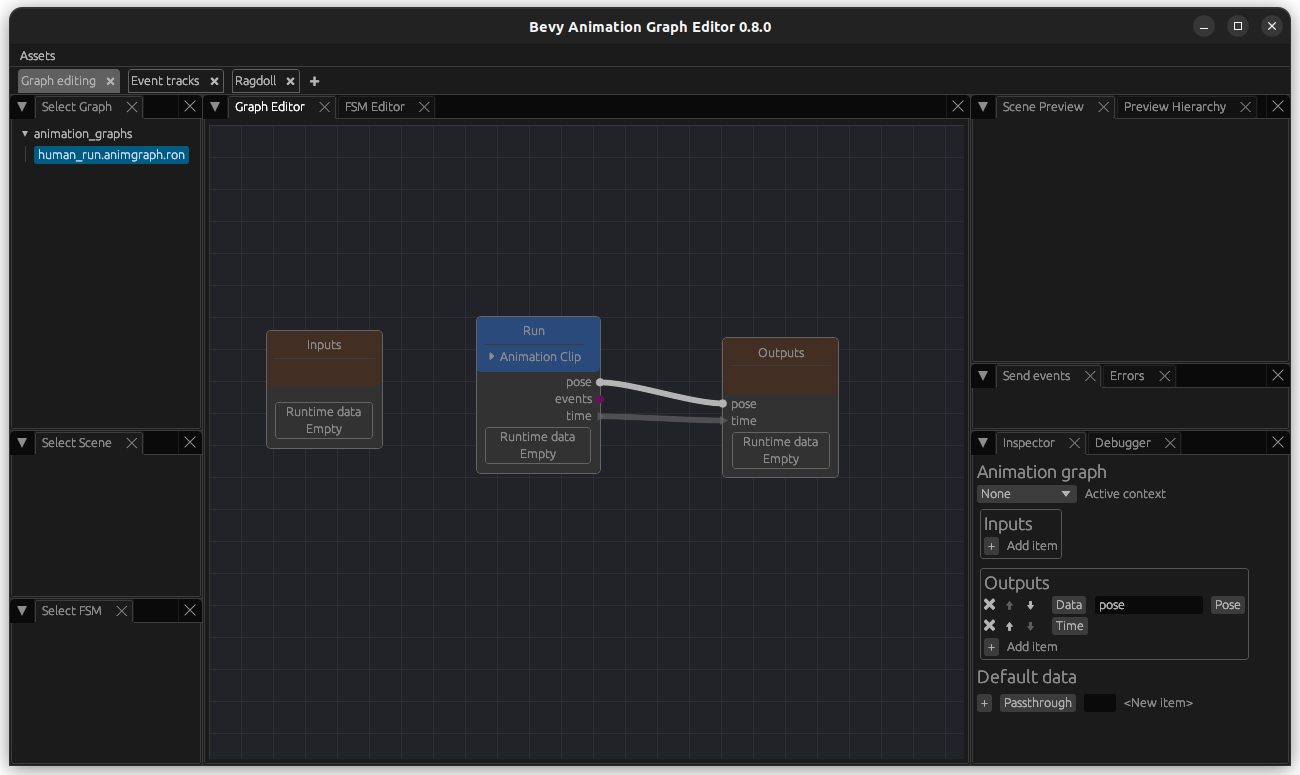
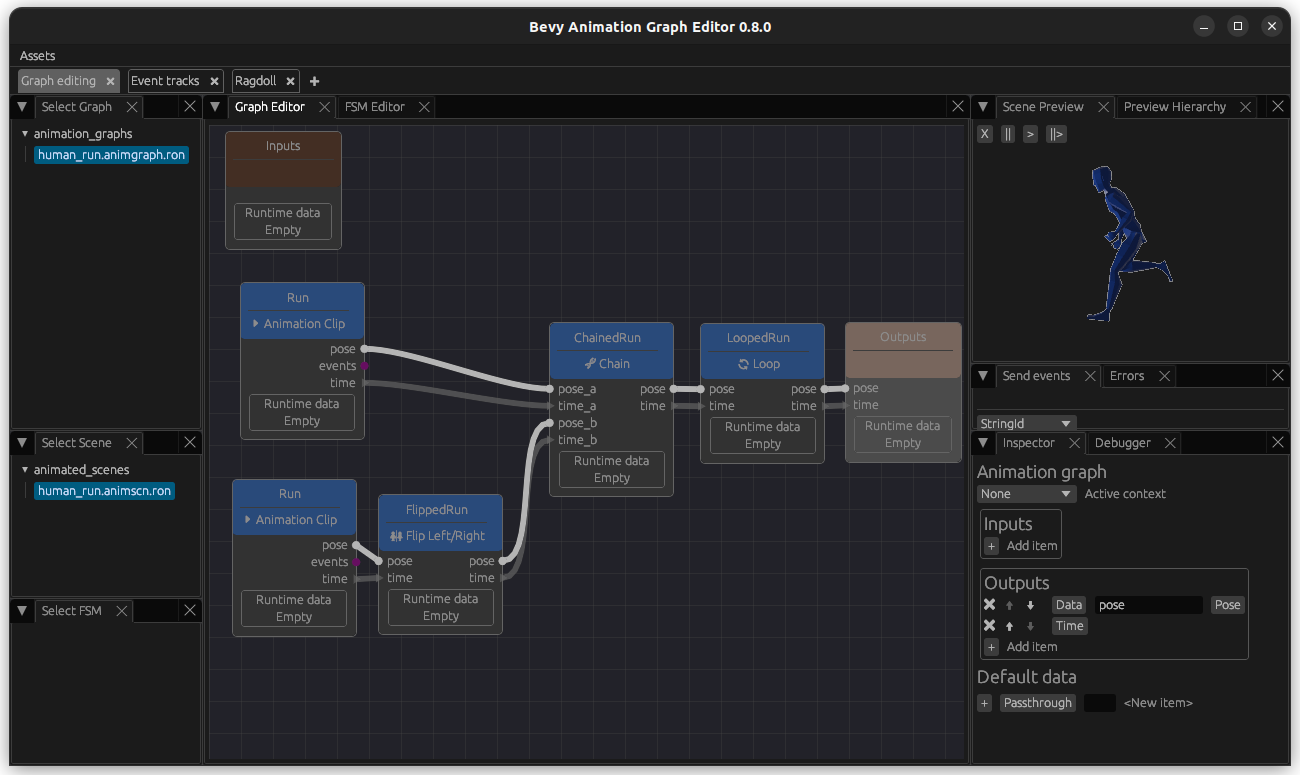
Select the animation graph. You can move the Inputs and the Outputs (initially underneath the Inputs) around to a convenient location for you. Then, create a ClipNode: right click on the graph editor canvas, select ClipNode on the list of node types (you can type in the search bar to filter), and specify your animation in the clip field. You can also give the node a label/name, but that's not required.
NOTE: You have to press Escape in order to close the node creator popup.
Arrange the nodes how you prefer it.
On the bottom right of the editor, you see an Animation Graph window where you can specify inputs and outputs. Add a Data - Pose type output named pose and a Time type output to it (you can add outputs with the + icon and change fields by clicking on them). Then connect the pose and the time output from the ClipNode to the Outputs node.
IMPORTANT: Press Ctrl+S in order to open the Save menu and save your animation graph! It is not auto-saved.
Finally, the last step is to create a scene. This step is not enabled in the animation graph editor yet, so create a file with the following content in the animated_scene folder (in my case, named human_run.animscn.ron):
(
    source: "models/human_animated.glb#Scene0",
    animation_graph: "animation_graphs/human_run.animgraph.ron",
    skeleton: "skeletons/human_skeleton.skn.ron",
)
Restart your editor.
Now select your scene and you should be able to see at least your model loaded in the top right. Depending on the size of the model you need to scroll in or out of the preview by using your mouse while hovering above the preview. You should be able to see the animation that you are playing in the graph, but if it is a short one and you missed its playing, you should at least see your model loaded correctly in the preview. If you cannot see your model, here are a couple things you could try:
- Load the model in an online gltf viewer to see if there are any issues with it.
- If you're using Blender, make sure you use a triangulation modifier when exporting (if your model contains non-triangular faces).
- Make sure a material is assigned to the model. Not having a material assigned can lead to a race condition that sometimes makes it invisible (but not always).
Mirror and chain it
In the case of this example, the animation was only the left half of a run-cycle: therefore, we need to chain it with a mirrored version of itself in order to get a full run cycle.
If you have a full animation, you may skip this section, but it might be useful to read it anyway---for example, if you want to mirror an attack animation.
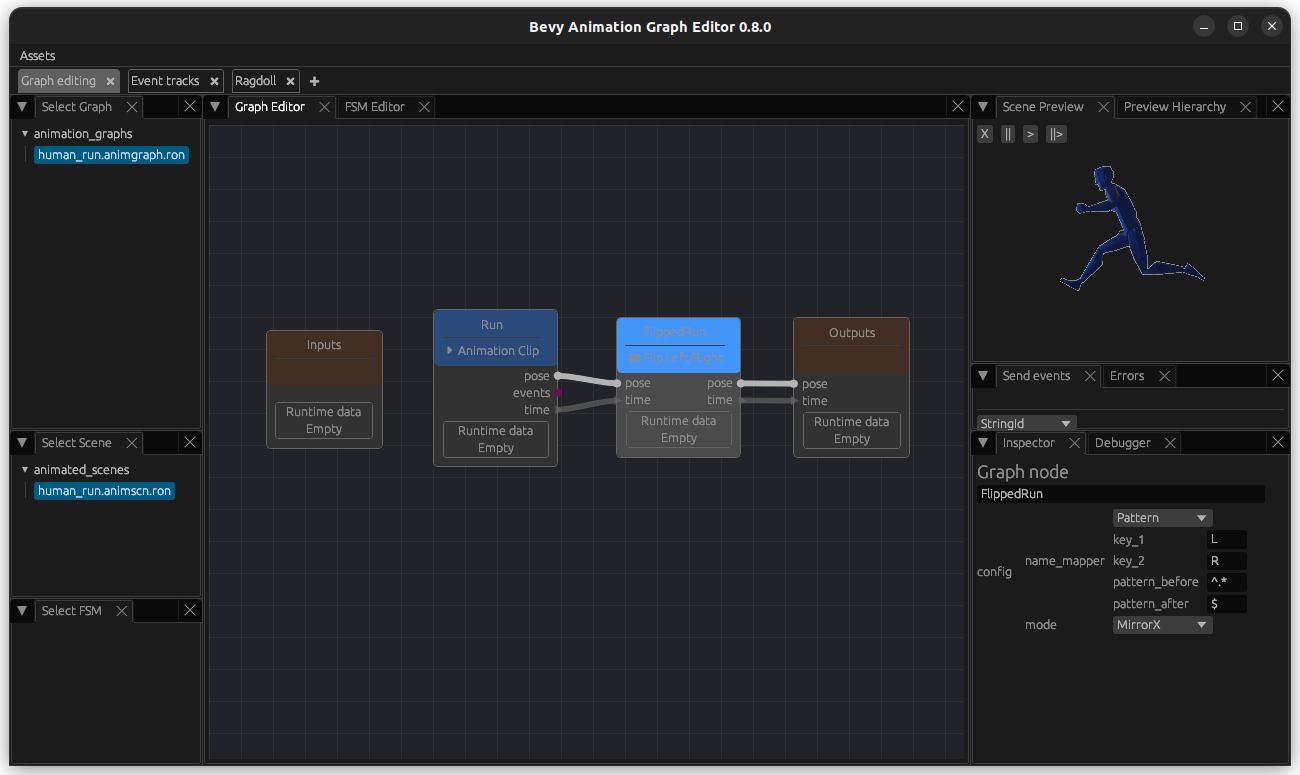
So first, create a FlipLRNode. Depending on your skeleton, update the filters for how the bones on the left side match to the right side: The defaults match configuration assumes left/right bone names end in L and R, respectively (and bones that shouldn't be mirrored have no L/R suffix). Then connect the ClipNode to it, and the FlipLRNode to the output.
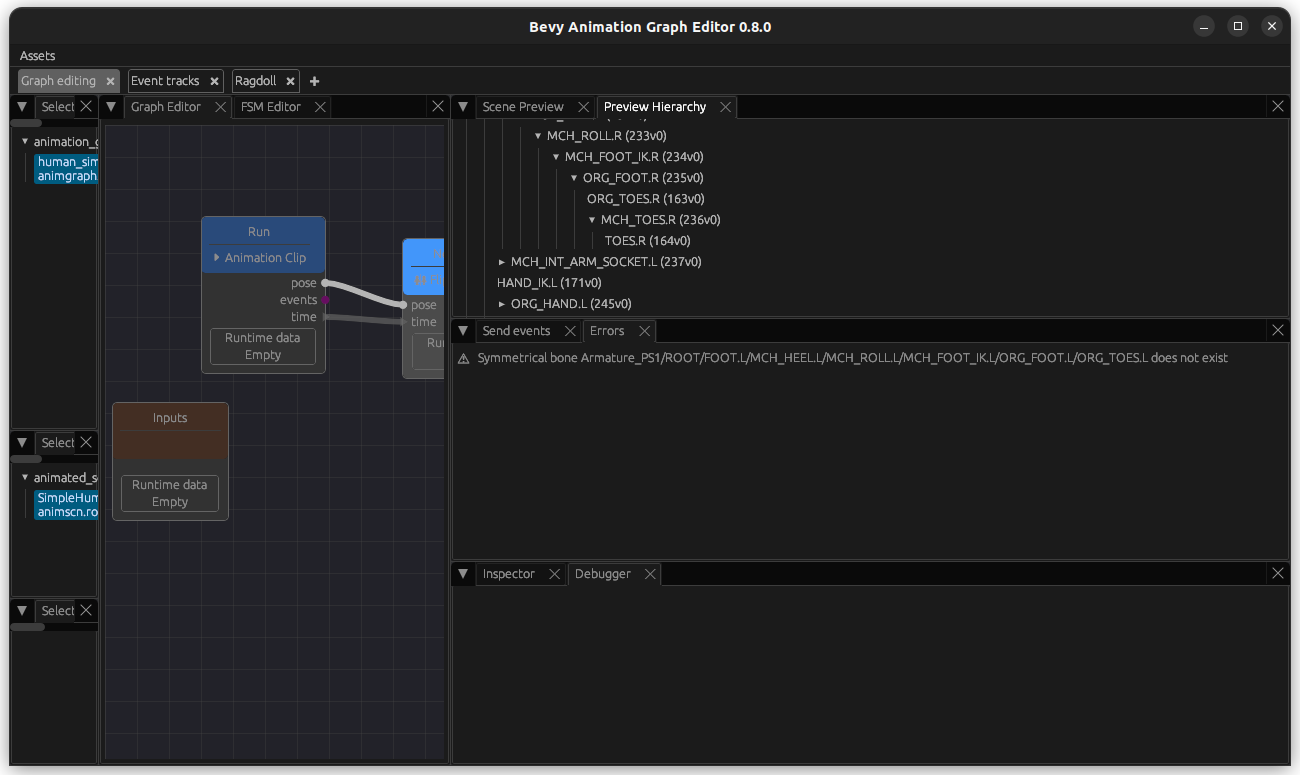
If there is no output, check the Errors tab that will display if there is a symmetry that is not found and use the Preview Hierarchy to figure out what is missing.
Now that we have succefully mirrored it, we want to play the non-mirrored animation followed by the mirrored animation. For this, first create another instance of the Run animation using a ClipNode - this will be our non-mirrored animation.
Now create a ChainNode. Then connect the ouput of the non-mirrored animation to the inputs pose_a and time_a of the ChainNode. Connect the mirrored animation to the inputs pose_b and time_b of the ChainNode. As before, the output of the ChainNode go to the Output.
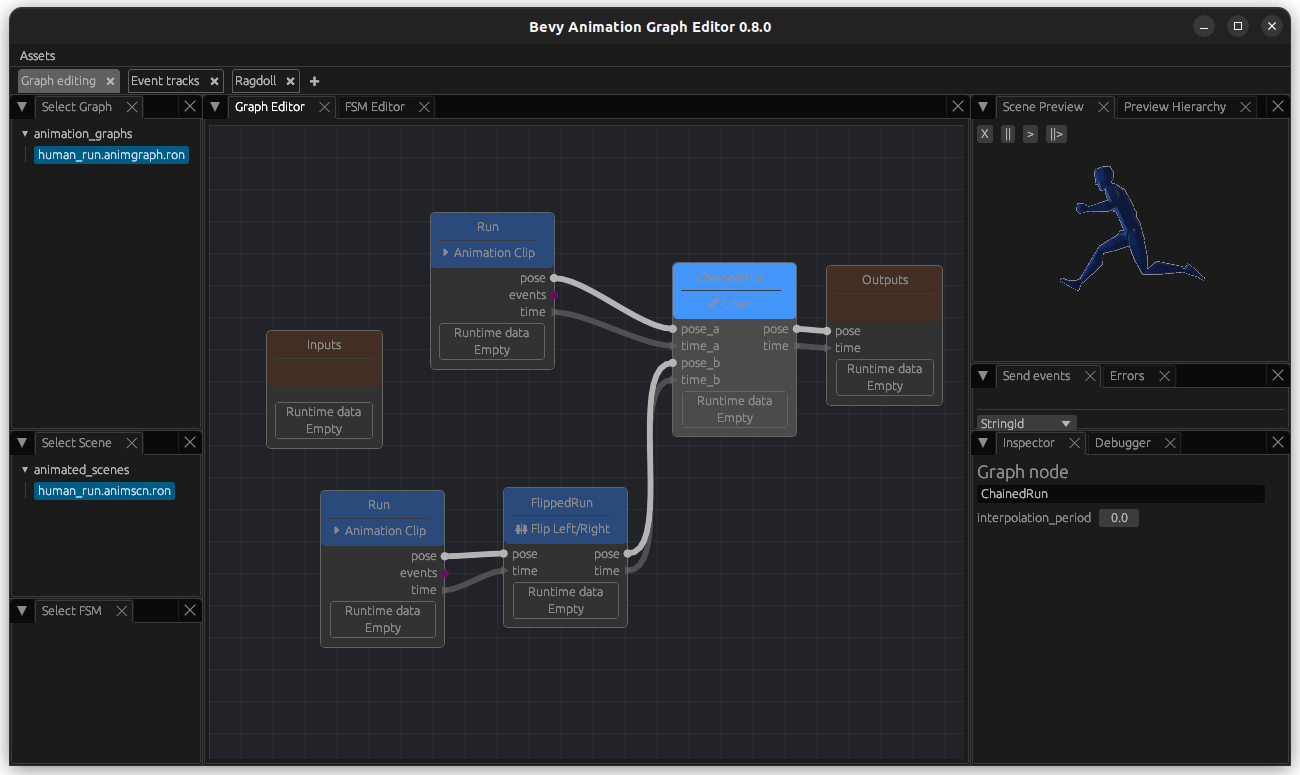
Now you should see both of them playing after another - since it is not looped, you may have to restart the animation_graph_editor to set the time to 0 and play it from the start (remember to save if you do that!).
Loop it
Finally, it is time to loop this. Create a LoopNode with default settings. Connect the output of the ChainNode (or, if you did not work with an animation that you have mirrored, from your ClipNode), to your LoopNode inputs and the outputs of the LoopNode to the Outputs.
Now you should be able to see your animation repeating endlessly!
Include it in your game
But most importantly - how do you actually use this in your game? A very simple example is found in the human example in the crate repository, but here are the most important points:
Register the animation graph plugin:
#![allow(unused)]
fn main() {
    App::new()
        // ... add your other plugins
        .add_plugins(AnimationGraphPlugin::default())
        // ... rest of your `App` setup
        .run();

}
And then spawn the animated character when needed:
#![allow(unused)]
fn main() {
    // Animated character
    commands.spawn((
        AnimatedSceneHandle::new(
            asset_server.load("animated_scenes/human_run.animscn.ron")
        ),
        Transform::from_xyz(0., 0., 0.),
    ));
}
Build your first basic FSM
Pre-Requisites
This chapter assumes you know how to create an Animation asset, an AnimationGraph asset, a ClipNode and have an already existing AnimationGraph containing a looped Running animation (which has been shown in the previous chapter). In addition to that, you should also have a simple attack animation in your .glb file - for example, I have a punching animation.
IMPORTANT: I will not mention that you need to remember to save throughout this tutorial, but please do this whenever you finish changing an animation graph or an FSM!
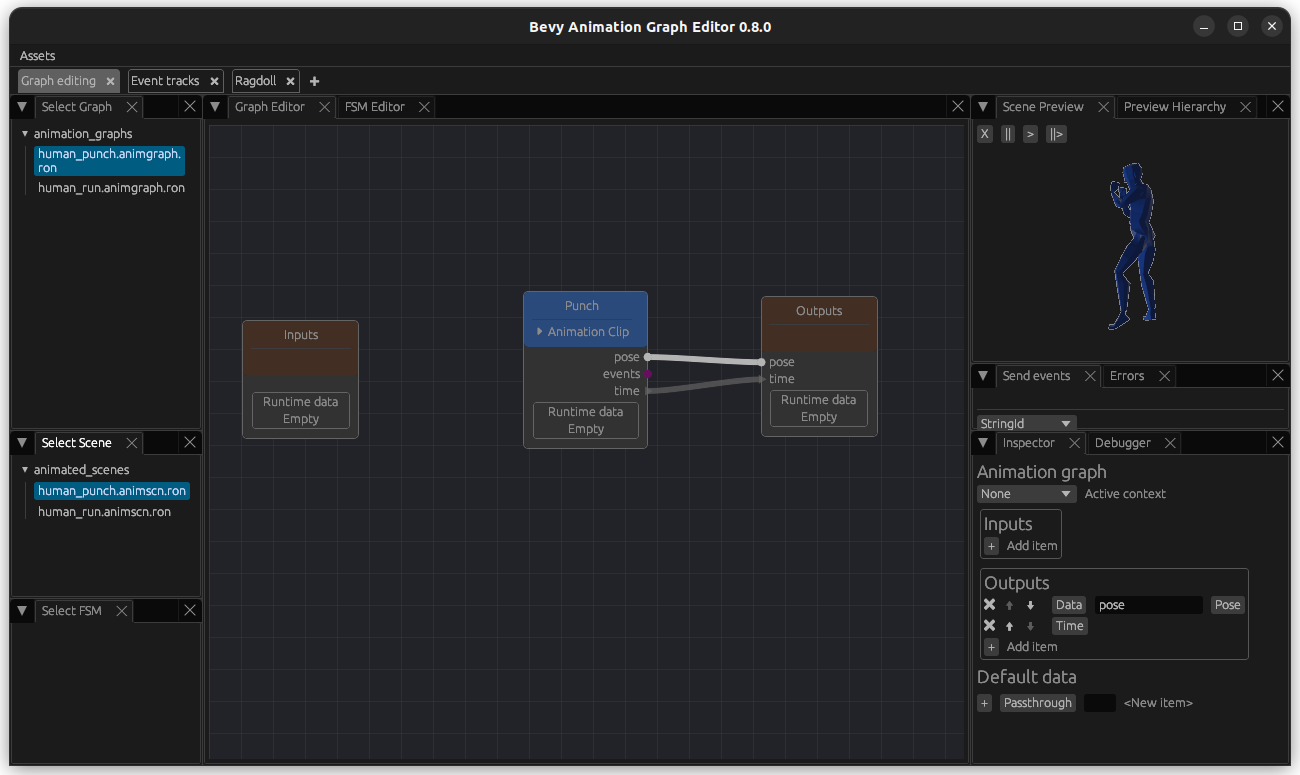
Create Punch animation graph
First, create an animation asset with your Punch animation in animations/human_punch.anim.ron.
Then create a new animation graph under the path animation_graphs/human_punch.animgraph.ron.
Create a ClipNode containing your punching animation, re-arrange the graph, add the pose and time outputs and connect the corresponding edges.
Save your animation graph and create a new scene in your animated_scenes folder named human_punch.animscn.ron, pointing to the new animation graph.
Restart your editor and select the new scene. As before, you should at least see your model now - our animation only plays once.
Create your first FSM
Create a new folder named fsm (and restart your editor after this). Then, select Assets (top left) -> Create -> State machine and create one under the path fsm/human_basic_fsm.fsm.ron.

Select your FSM and go to the FSM Editor tab. Create the first Run state by right-clicking on the fsm editor canvas. Give the state a label (Run), and link it to the corresponding animation graph. Leave the rest as default. Use Escape to close this menu.

NOTE: Ticking the enable state transition checkbox allows every other state in your FSM to transition to this state using the transition you define there. This is useful if you have a state that should always be reachable - you do not need to create all those transitions by hand. If in addition, a direct transition (how to create these is explained below) is defined, the direct transition behaviour will take precedence. If this option is enabled, the state will have a little lightning bolt icon.
Then, create another state with the label Punch, linking to the punch animation graph.
As before, you can drag the states to your preferred arrangement.
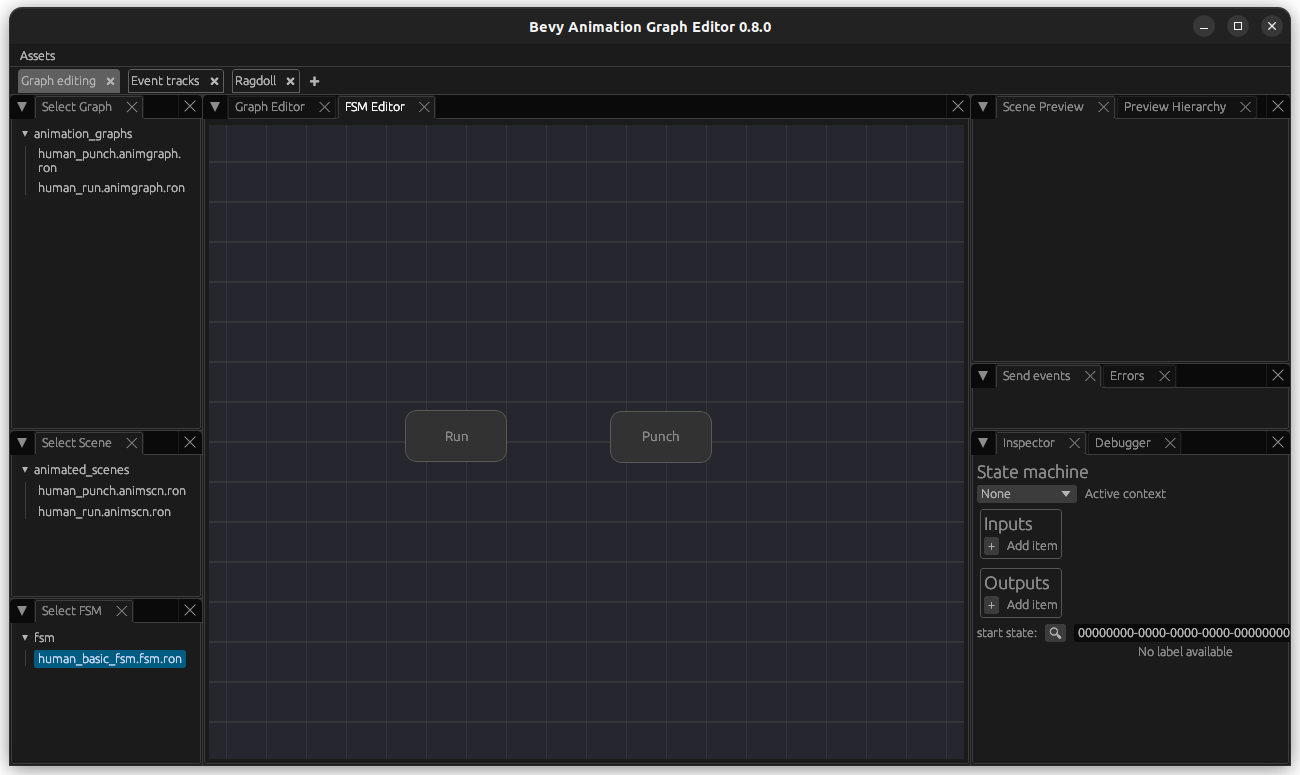
Like for any FSM, we also need to provide the start state in the state machine Inspector on the bottom right: choose the Run state.
NOTE: This will add a second box around the
Runstate indicating that it is the start state in the FSM editor UI.

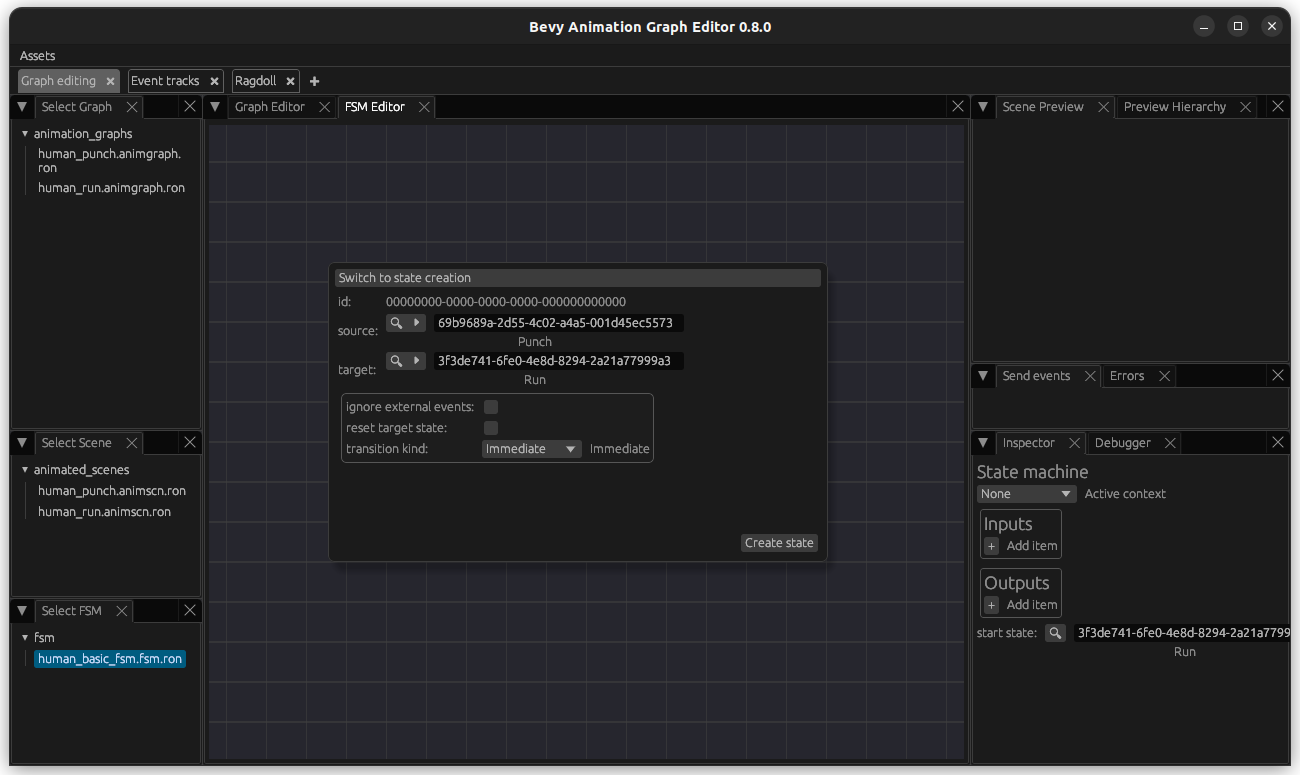
Now we need to add the transition from Run to Punch: right-click again and click on Switch to transition creation. Select Run as the source state and Punch as the target state. Remember that we only play the punch animation once - so for this graph, our time needs to be reset to 0 in order for the animation to actually be visible. In order to do this, tick the reset target state box. Leave the rest at their default.
NOTE: You can also enable
ignore external eventsto make that transition only respond to internal events (i.e. events output from graphs which are assigned to states or transitions in that FSM). For example, if you only fire an "attack" event on a single frame, you'll likely not want the FSM to immediately transition back to a locomotion state the frame right after.

Add another transition from Punch (source state) to Run (target state), but leave all settings at their default state.
The transitions will be illustrated as arrows and if you want to edit them in the future, you only need to select them.
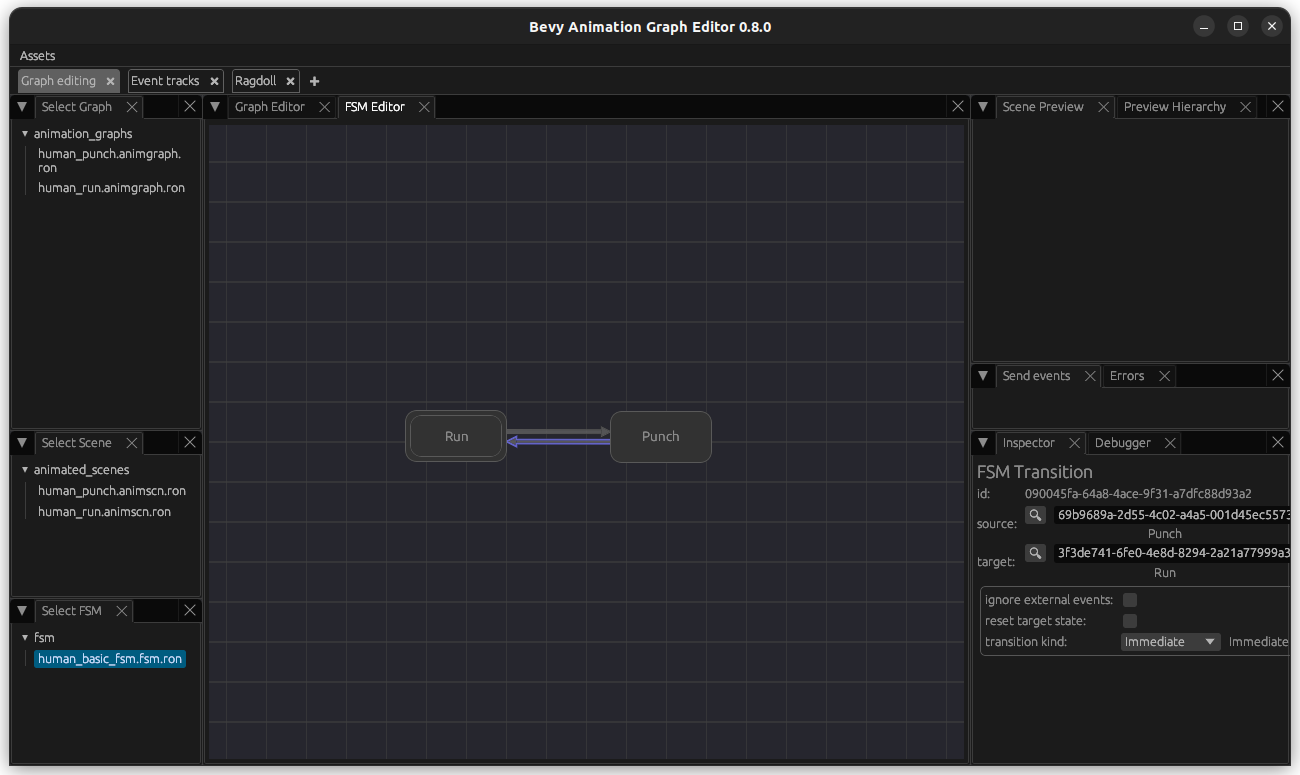
Finally, add the pose and time output as we did for our animation graphs so far.

Use and test your FSM in an animated scene
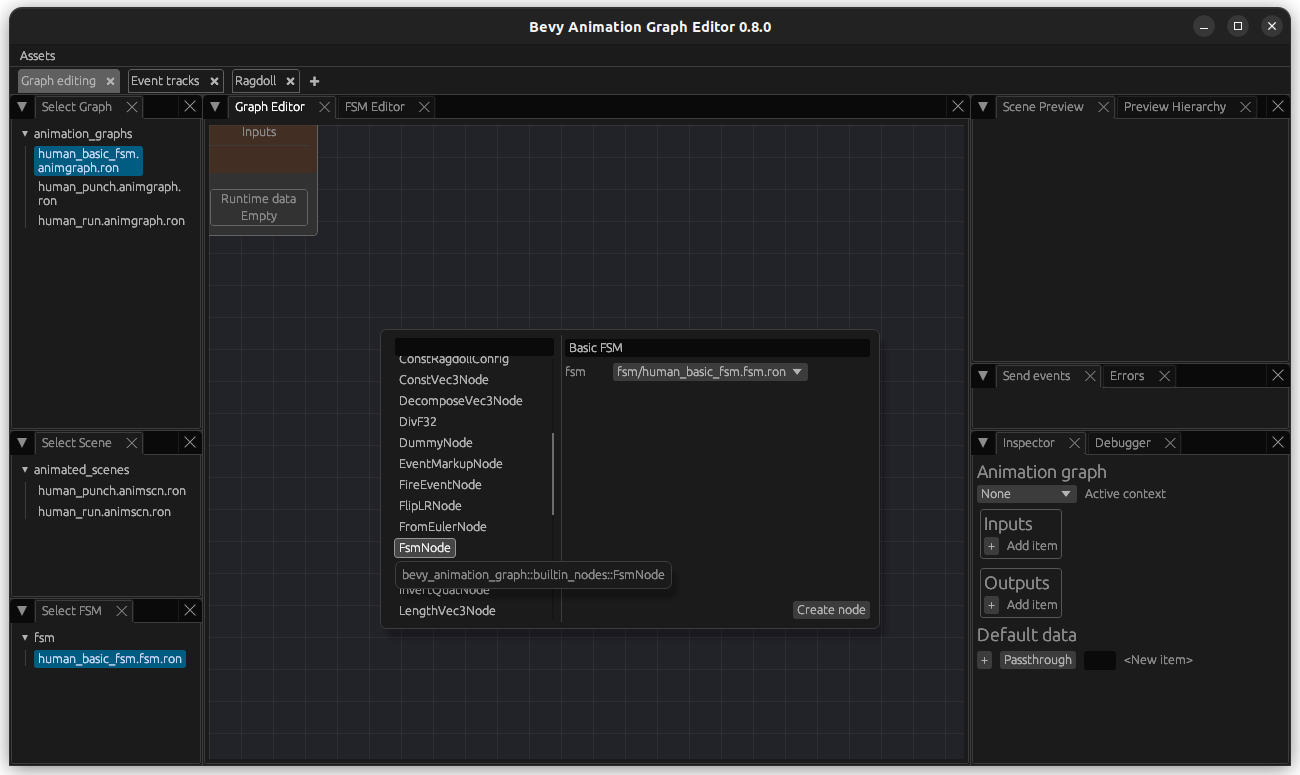
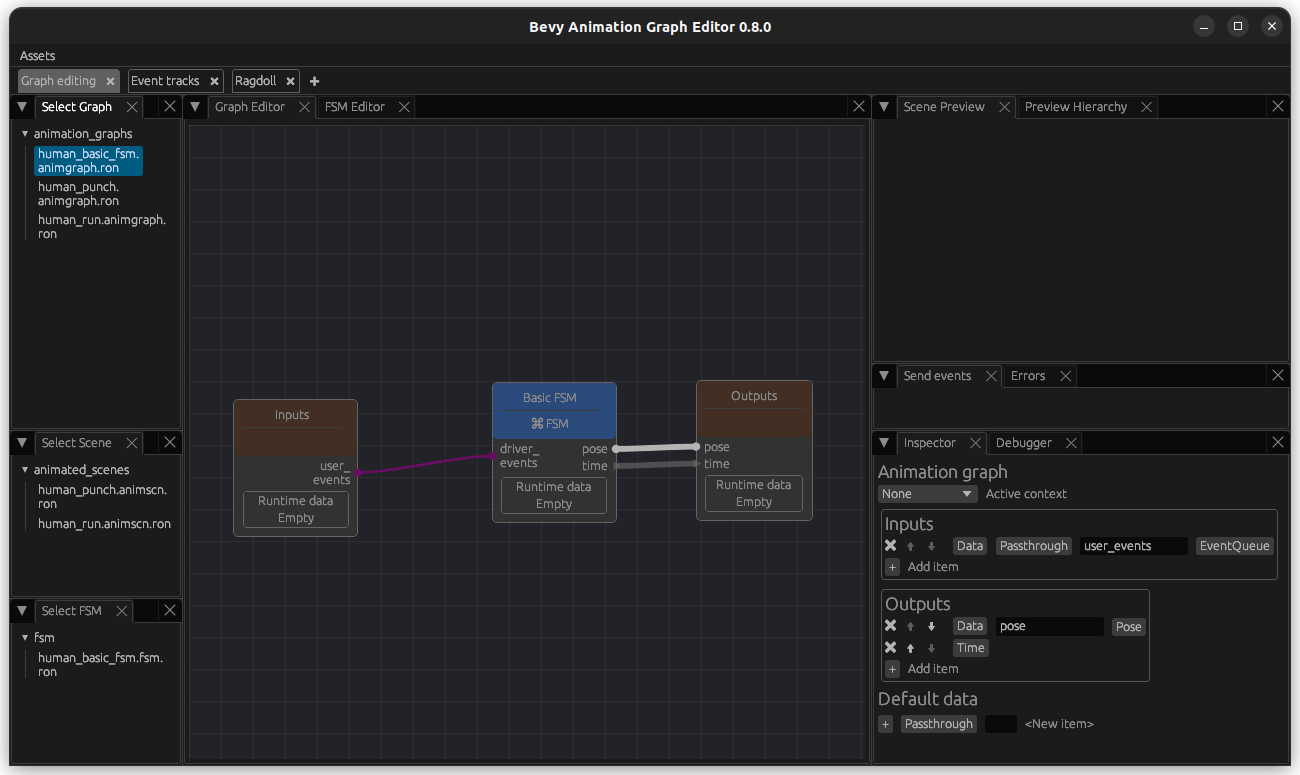
Create a new animation graph called animation_graphs/human_basic_fsm.animgraph.ron, select it and switch back to the Graph Editor tab. Create an FsmNode and link it to your graph.
You will notice that this node takes driver_events as input - this will be the events that are used to trigger transitions. These need to come from another node in the graph, in our case Inputs directly - so click on it and add an input called user_events of type Data - Passthrough - EventQueue and connect the edges.
NOTE: This needs to be called
user_eventsin order for it to receive the events that get passed from the game. It also needs this name if you want to do testing from the editor UI, since the events that you fire (described below) will be added to theuser_eventsEventQueue.
In addition, add the pose and time outputs as usual and connect them.
In order to get our preview working, lets create a new scene in your animated_scenes folder named human_basic_fsm.animscn.ron, pointing to the human_basic_fsm.animgraph.ron animation graph.
Restart your editor and select the scene. You should see your character running. If this is not the case, go through the steps above again and check if you missed anything.
NOTE: In the FSM editor, you can see the state you are currently in highlighted in green.
Now, we want to test a transition: Go to the Send Events menu (on the right in the middle). Add an event of type TransitionToStateLabel, name it Punch and click add.

Then click on the newly created button. Now you should see your Punch animation playing once and the Punch state should be hightlighted in green.
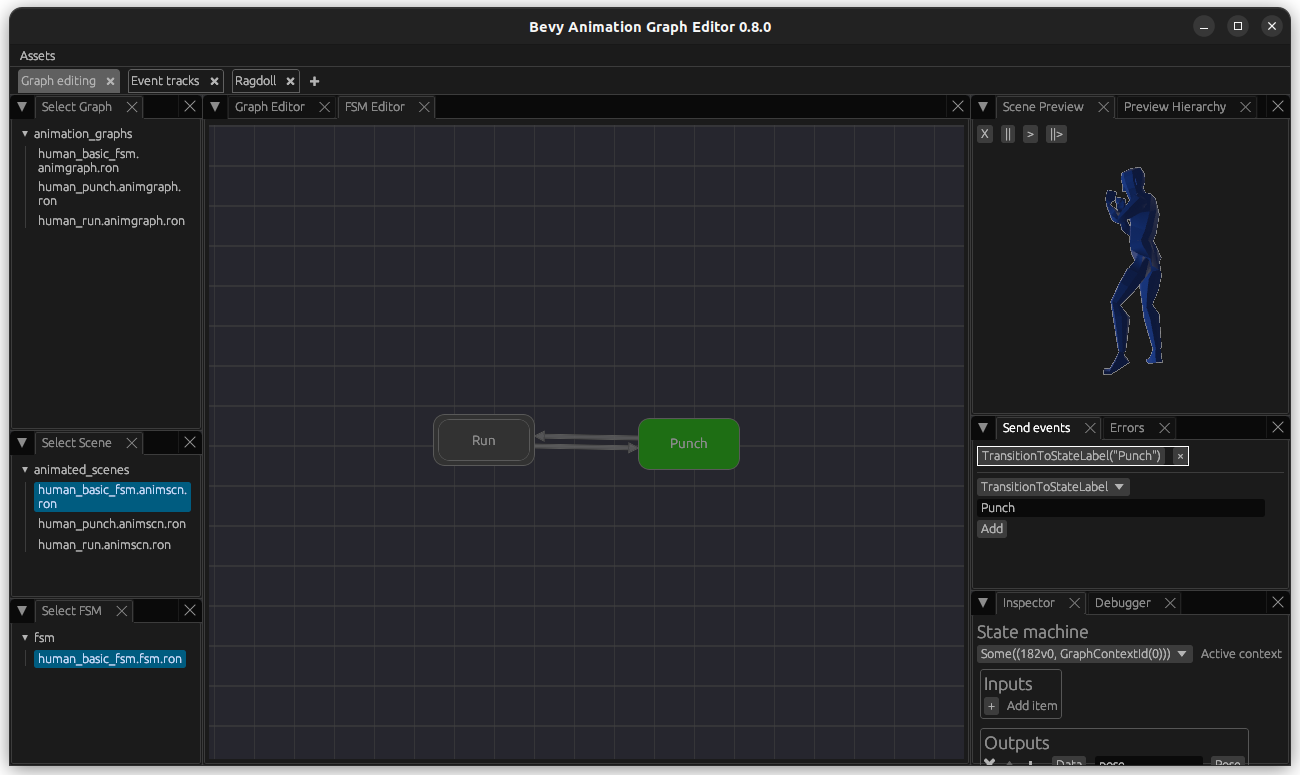
Now you can add another TransitionToStateLabel named Run and switch between those two states as you desire.
Issue 1: we should leave punch state after punch
While this basic setup works, there is one immediate issue: Why do we stay frozen in the punch stance at the end of the animation instead of automatically switching back to another reasonable animation? In our case, we would want to switch back to the running state at the end of our punch animation.
NOTE: Remember that for the sake of simplicity, we only have two states here - in your own game, you can have another state to switch to, for example an idle stance. In a later chapter, we will cover a more advanced setup including a more advanced FSM.
In order to achieve this, we first need to know when the punch animation ends and fire an event to transition to the Run node: Open your human_punch.animgraph.ron graph and let's add a MapEventNode, which gets triggered (map_from) when the animation clip ends (AnimationClipFinished) and fires (map_to) a transition to Run event (TransitionToStateLabel type).

Now we need to add events to the output: Create a new output called driver_events of type Data - EventQueue and connect it.
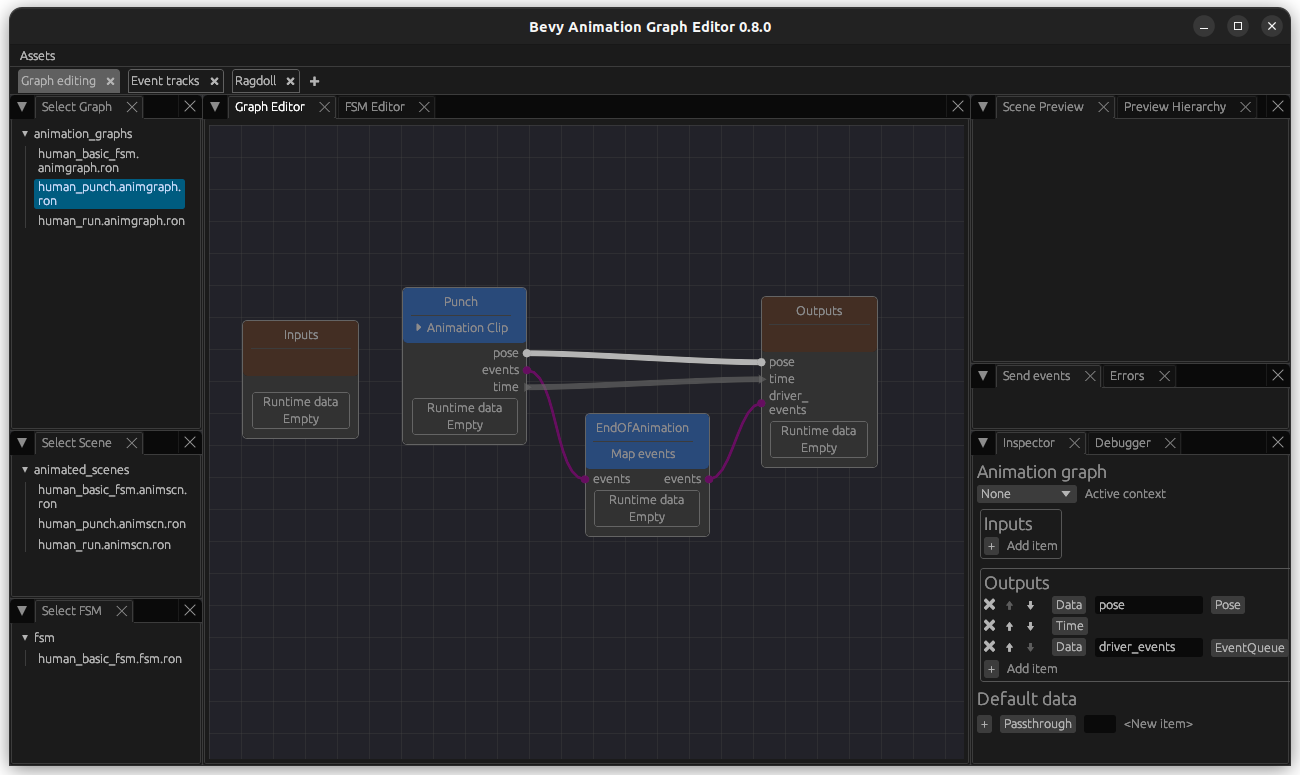
This is all that is required to make it automatically switch back to running after the animation ends - give it a try!
Issue 2: our state transitions are too abrupt
Another obvious issue is that the transition is very abrupt: one solution is to actually add hand-made animations for the transitions. In order to do this, you simply need to put them into an animation graph, enter your FSM, select your transition and change the transition kind to Graph, pointing it at the animation graph containing your animation.
However, adding this for all possible transitions is a lot of work, especially if you are just starting developing your game and you want it to look smooth, but it does not need to be perfect. Even later the solution proposed below might feel good enough that you don't need to add custom transition animations.
For a simple and resuable solution, we can create a custom animation graph that will simply blend the animations from the source and the target state for a defined amount of time.
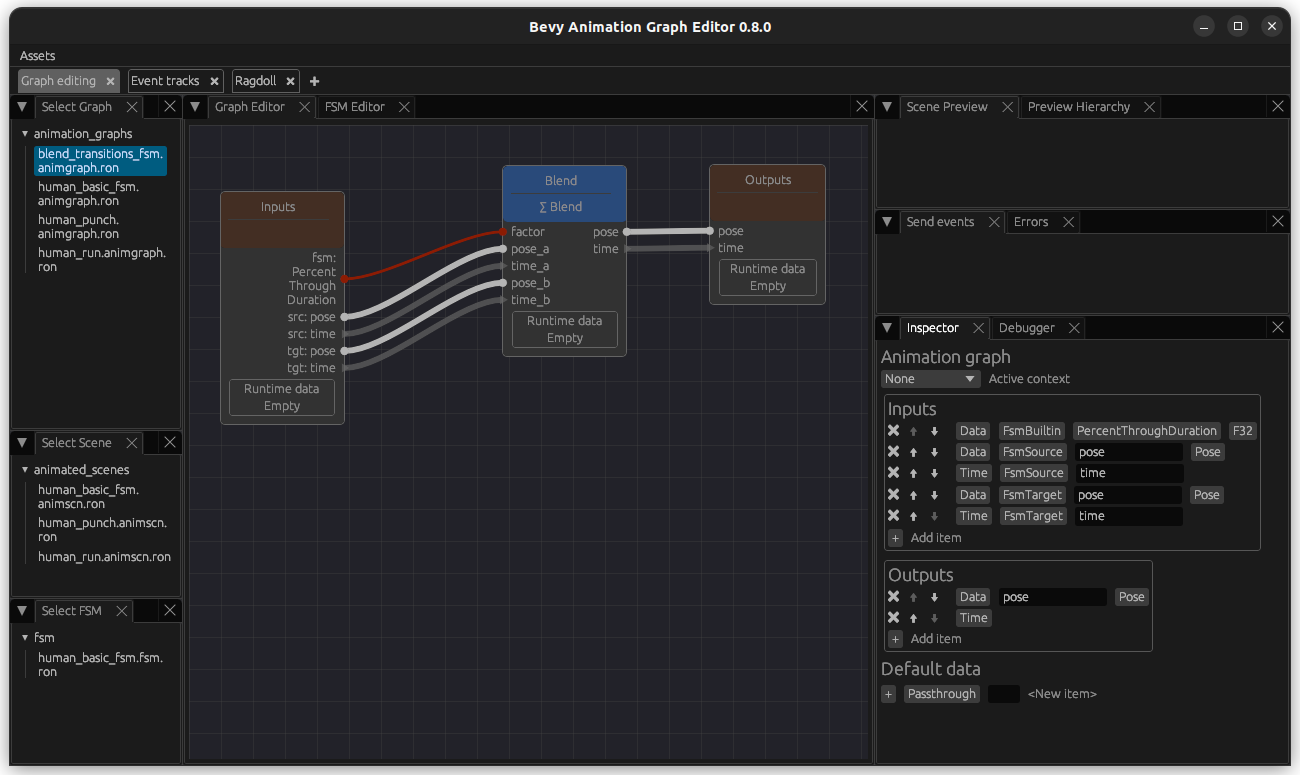
Create an animation graph called animation_graphs/blend_transitions_fsm.animgraph.ron. Create a BlendNode leaving the default as they are. As you see, it takes a factor, pose_a, time_a, pose_b, and time_b.
Lets think about what the factor could be: How about it blends the transitions for the transition duration with a weight increasing linearly from 0 to 1 (which denotes the weighting of pose_b)? Luckily there is an input type for getting exactly this value: Add an input of type Data - FsmBuiltin - PercentThroughDuration and connect it to Factor.
In addition, lets add an input of type Data - FsmSource - Pose called pose and another input of type Time - FsmSource called time and connect them to pose_a and time_a. Finally add an input of type Data - FsmTarget - Pose called pose and another input of type Time - FsmTarget called time and connect them to pose_b and time_b.
IMPORTANT: The naming of the input variable must match the output variable names of the AnimationGraphs used in the corresponding FSM States. That is why using pose and time as output variable names whenever possible makes it easier to write general animation graphs like this, it can now be reused as long as we only have animation graphs following the same output variable naming conventions.
As usual, add pose and time outputs and connect the node.
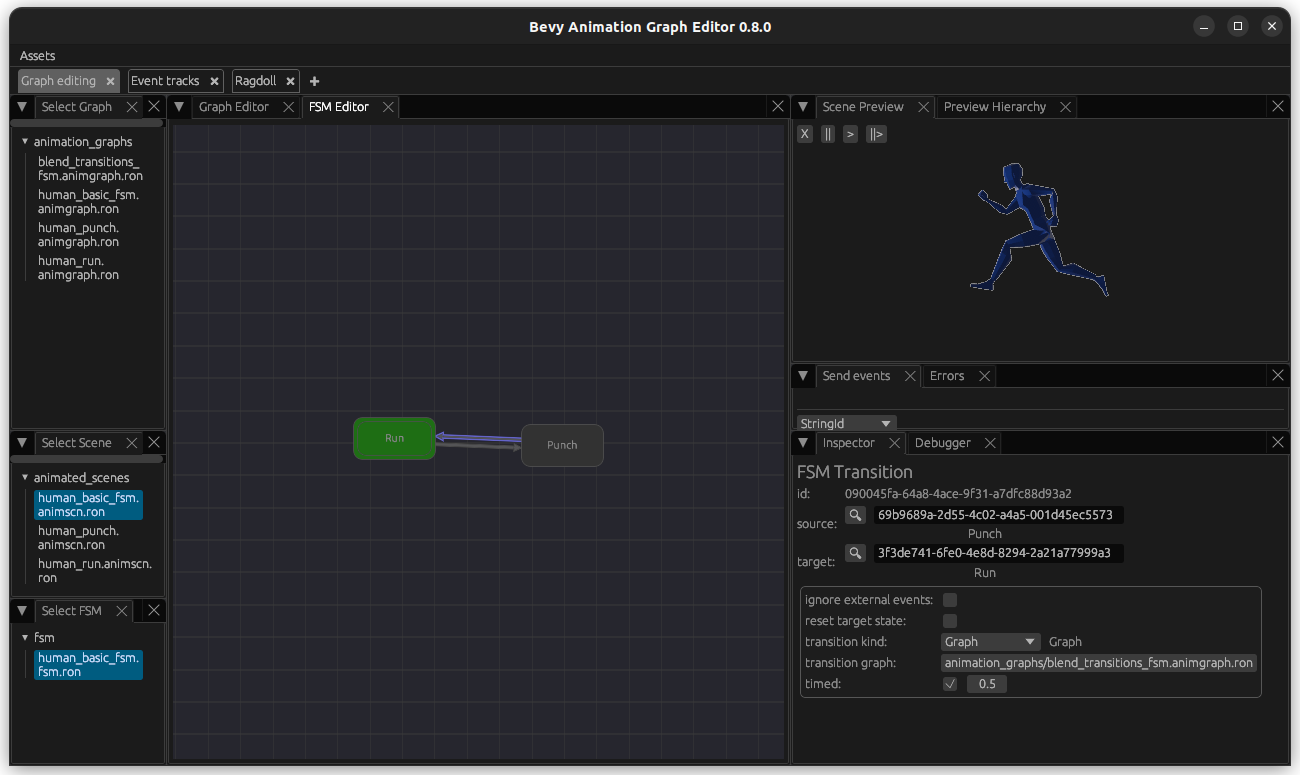
Let's go back to our FSM and change both transitions: Set the transition kind to Graph and select our new animation graph. Make it timed and set it to a value that feels good when you look at it - I used 0.1 for the transition from Run to Punch and 0.5 for switching from Run to Punch.

I finetuned these values with a Punch event in the Send events tab and just adjusted them until it looked good.
Passing events from your code
Now you will need to send the Punch event from your game. Sending an event is very easy, assuming that you have player, which is the mutable player instance associated with the AnimationGraphPlaywer:
#![allow(unused)]
fn main() {
player.send_event(AnimationEvent::TransitionToStateLabel("Punch".into()));
}
For a complete example, you can refer to the human fsm example in the crate repository.
A speed-based run-walk controller
In this chapter, we will learn how to use a speed variable to smoothly blend a walk and a run animation.
Pre-Requisites
This chapter assumes you know how to create an Animation asset, an AnimationGraph asset, a ClipNode, ChainNode and LoopNode. In addition to that, you should have a run and a walk-cycle animated (here, I have a half of a run-cycle as a clip and a full walk cycle.), and an Asset of type animations created for both.
IMPORTANT: I will not mention that you need to remember to save throughout this tutorial, but please do this whenever you finish changing an animation graph or an FSM!
The formulas behind blending speed and walk animations
First we need to find the formula for blending walking and running based on their respective speeds and the target speed.
Up to a certain speed (blend_start) we only play the walk animation and do not blend. Between blend_start and blend_end we blend the walk and run animation. For a speed higher than blend_end, we want to play only the running animation. We can compute this blend_factor as follows:
blend_factor = clamp((target_speed - blend_start) / (blend_end - blend_start), 0, 1)
In addition to this, we also want a playback speed factor since the speed of the walking or running playback will need to be adjusted based on the speed of the character:
speed_factor = target_speed / (walk_base_speed * (1 - blend_factor) + run_base_speed * blend_factor)
Create a custom node with our blend factor
Lets start by creating a new custom node in a new file named locomotion_blend_parameters_node.rs which simply does the above calculations.
For this, we need to define the input and output nodes and their types (specs), what it does on an update (e.g. what gets done by the node each step) and its display_name
#![allow(unused)]
fn main() {
extern crate bevy;
extern crate bevy_animation_graph;

use bevy::prelude::*;
use bevy_animation_graph::core::{
    animation_node::{NodeLike, ReflectNodeLike},
    context::{new_context::NodeContext, spec_context::SpecContext},
    edge_data::{DataSpec, DataValue},
    errors::GraphError,
};

#[derive(Reflect, Clone, Debug, Default)]
#[reflect(Default, NodeLike)]
pub struct LocomotionBlendParametersNode;

// First we define the input and outputs of our node. We will take in all the values required for the calculations
// and output the result. We define the names of the input and outputs here.
impl LocomotionBlendParametersNode {
    // walk_base_speed
    pub const IN_WALK_BASE_SPEED: &'static str = "walk_base_speed";
    // run_base_speed
    pub const IN_RUN_BASE_SPEED: &'static str = "run_base_speed";
    // target_speed
    pub const IN_TARGET_SPEED: &'static str = "target_speed";
    // blend_start
    pub const IN_BLEND_START: &'static str = "blend_start";
    // blend_end
    pub const IN_BLEND_END: &'static str = "blend_end";
    // blend_factor
    pub const OUT_BLEND_FACTOR: &'static str = "blend_factor";
    // speed_factor
    pub const OUT_SPEED_FACTOR: &'static str = "speed_factor";
}

impl NodeLike for LocomotionBlendParametersNode {
    fn update(&self, mut ctx: NodeContext) -> Result<(), GraphError> {
        // We can read the inmput data. Nodes are evaluated lazily, so
        // whatever is connected to the inputs won't compute anything until we attempt to read them.
        // the distance a full walk cycle moves
        let walk_base_speed = ctx
            .data_back(Self::IN_WALK_BASE_SPEED)
            .unwrap_or(DataValue::F32(1.29))
            .into_f32()?;
        // the distance a full run cycle moves
        let run_base_speed = ctx
            .data_back(Self::IN_RUN_BASE_SPEED)
            .unwrap_or(DataValue::F32(3.54))
            .into_f32()?;
        let target_speed = ctx.data_back(Self::IN_TARGET_SPEED)?.into_f32()?;
        // blend start parameter: the speed at which to start blending with the run - experiment what feels good
        let blend_start = ctx
            .data_back(Self::IN_BLEND_START)
            .unwrap_or(DataValue::F32(1.9))
            .into_f32()?;
        // blend run parameter: the speed at which to always run - experiment what feels good
        let blend_end = ctx
            .data_back(Self::IN_BLEND_END)
            .unwrap_or(DataValue::F32(3.))
            .into_f32()?;

        // lets do the calculations described in the tutorial
        let blend_factor = ((target_speed - blend_start) / (blend_end - blend_start)).clamp(0., 1.);
        let speed_factor =
            target_speed / (walk_base_speed * (1. - blend_factor) + run_base_speed * blend_factor);

        // Publish the output pose to the corresponding output data pin
        ctx.set_data_fwd(Self::OUT_BLEND_FACTOR, blend_factor);
        ctx.set_data_fwd(Self::OUT_SPEED_FACTOR, speed_factor);

        Ok(())
    }

    fn display_name(&self) -> String {
        // This is the name that will be displayed in the editor for the node
        "Locomotion Blend Parameters node".into()
    }

    // Specify the data type for all the inputs and outputs
    fn spec(&self, mut ctx: SpecContext) -> Result<(), GraphError> {
        // Specify input data pins for this node with the correc type
        ctx.add_input_data(Self::IN_WALK_BASE_SPEED, DataSpec::F32);
        ctx.add_input_data(Self::IN_RUN_BASE_SPEED, DataSpec::F32);
        ctx.add_input_data(Self::IN_TARGET_SPEED, DataSpec::F32);
        ctx.add_input_data(Self::IN_BLEND_START, DataSpec::F32);
        ctx.add_input_data(Self::IN_BLEND_END, DataSpec::F32);

        // Specify output data pins for this node with the correct tyope
        ctx.add_output_data(Self::OUT_BLEND_FACTOR, DataSpec::F32);
        ctx.add_output_data(Self::OUT_SPEED_FACTOR, DataSpec::F32);

        Ok(())
    }
}

}
Then we need to create a custom editor as a plugin that includes our blendnode in a separate bin directoy in a file I named editor.rs - that way we can run it and keep the version of the editor as a dev dependencies while also using the CustomNodes both in our plugin binary as well as in our game.
use bevy::app::App;
use bevy_animation_graph_book::locomotion_blend_parameters_node::LocomotionBlendParametersNode;
use bevy_animation_graph_editor::AnimationGraphEditorPlugin;

fn main() {
    let mut app = App::new();
    app.add_plugins(AnimationGraphEditorPlugin);
    app.register_type::<LocomotionBlendParametersNode>();
    app.run();
}
And you can run it like this:
cargo run --bin editor -- -a assets
Create the run-walk animation graph
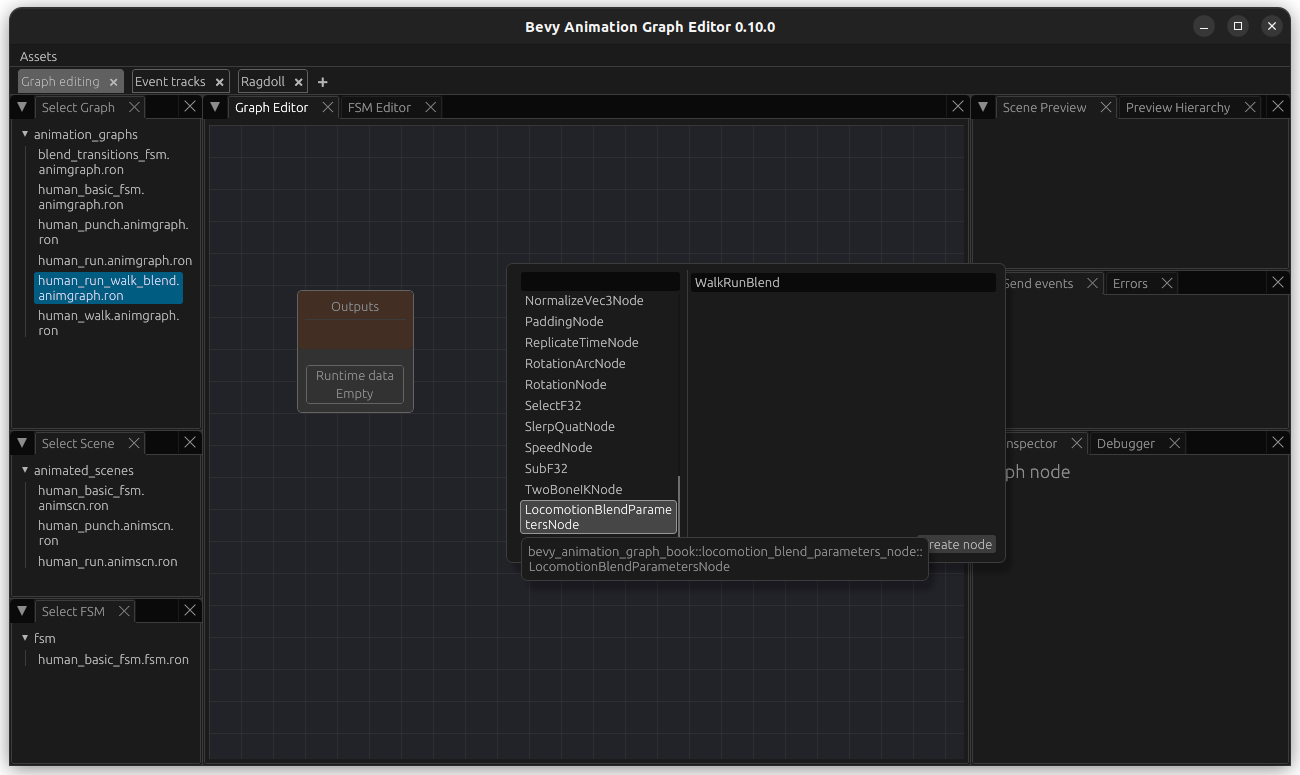
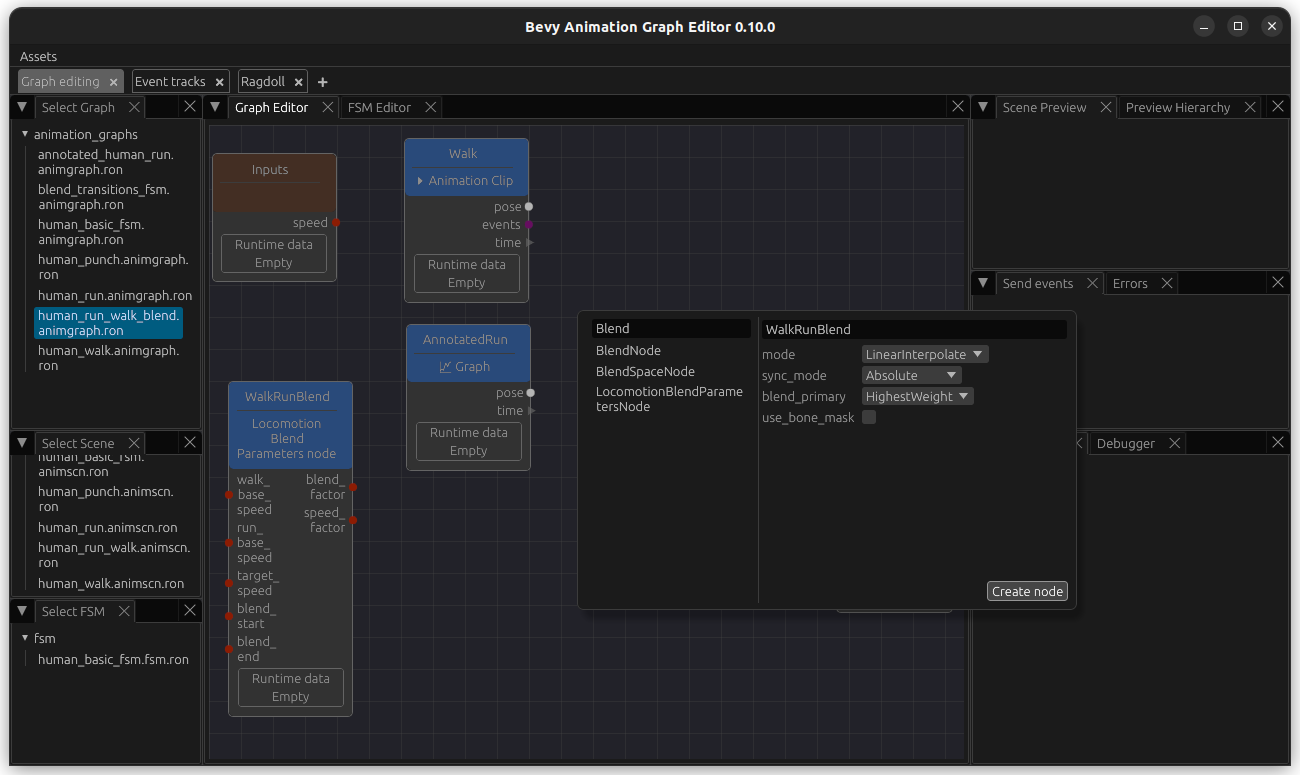
Then we create a new animation graph for our controller and name it human_run_walk_blend.animgraph.ron. In this graph, we add a new node named WalkRunBlend of our new custom type LocomotionBlendParamtersNode.
Then we want to create a new simple run Graph. I named this one AnnotatedRunGraph although for now, it is a simple Run graph without a LoopNode (e.g. chain the flipped animation and the normal animation). Note that I have connected the flipped animation first since walk start with the left foot as well.

Then, back in our human_run_walk_blend.animgraph.ron, create a ClipNode containing our walk animation. Next add a GraphNode that points to our newly created run graph. In addition to this, we will also add an input named speed. Our graph looks like this so far:

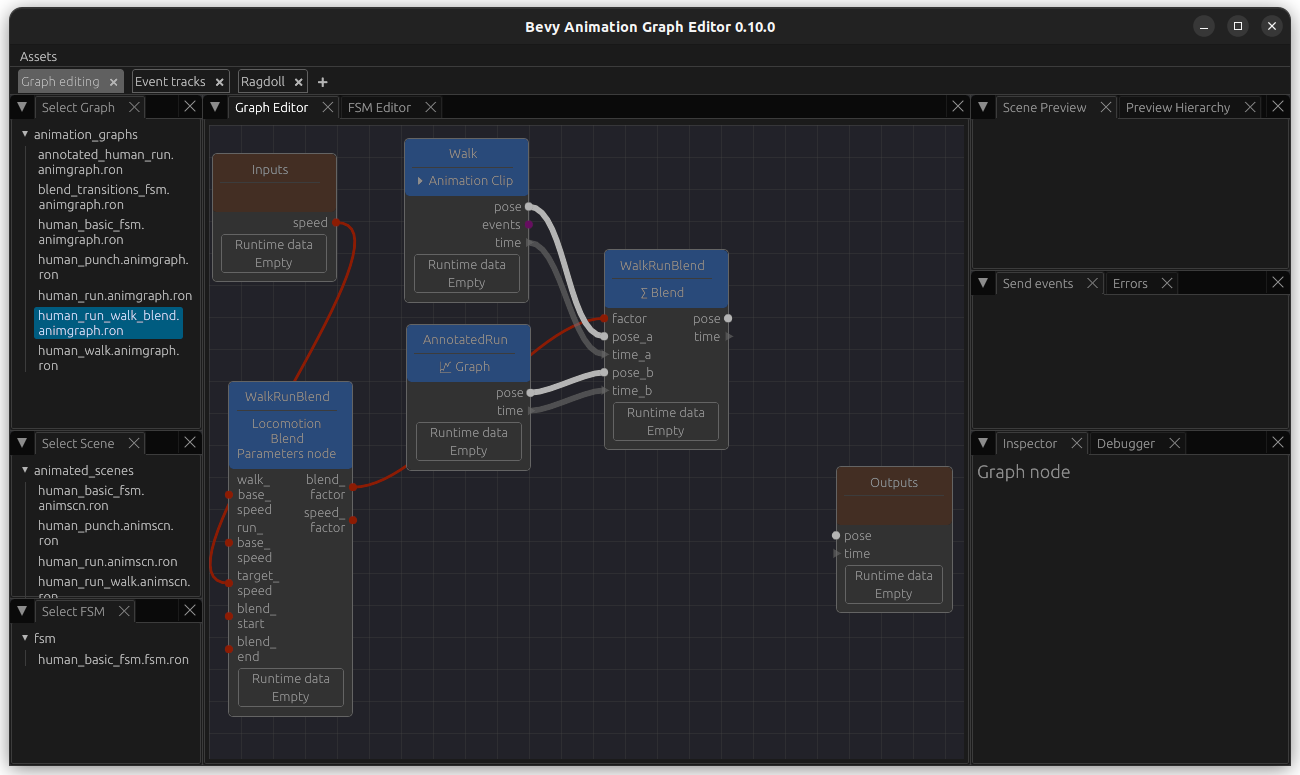
Now we add the blend node. We update blend_primary to use HighestWeight. This bases the duration of the BlendNode on the input with the higher weighting, which looks better since we have two inputs with two different lengths.
Now connect the blend_factor and the pose and time outputs from the walk and run animation nodes to it like this and add pose and time outputs. We also connect the speed input.
Finally, add a LoopNode add the end and connect it all together. As before, create a scene with this animation graphs so we can use the preview. In order to be able to test this, we also add speed as a passthrough parameter (bottom right) and we can adjust its values and see how the walk and run gets overlayed with each other.
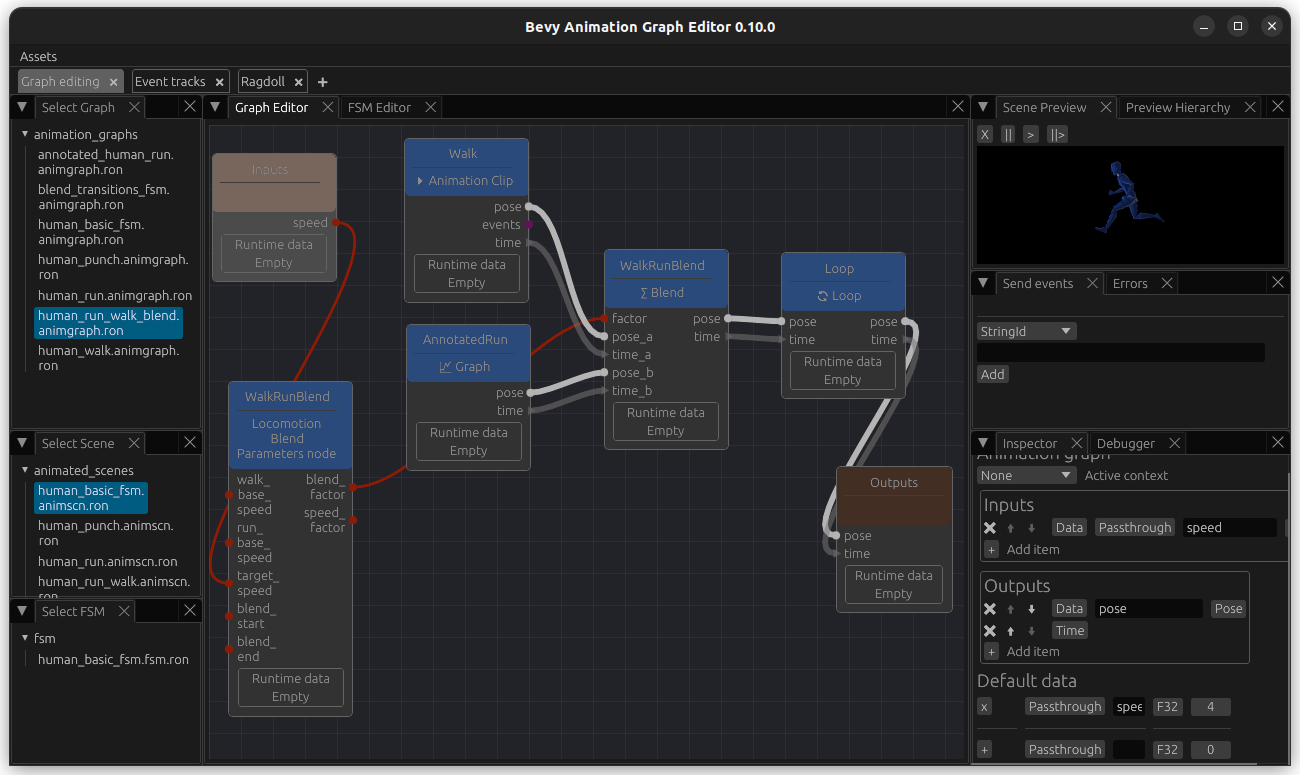
Now we can change the value of the passthrough parameter to see how it looks like at different blend_factors.
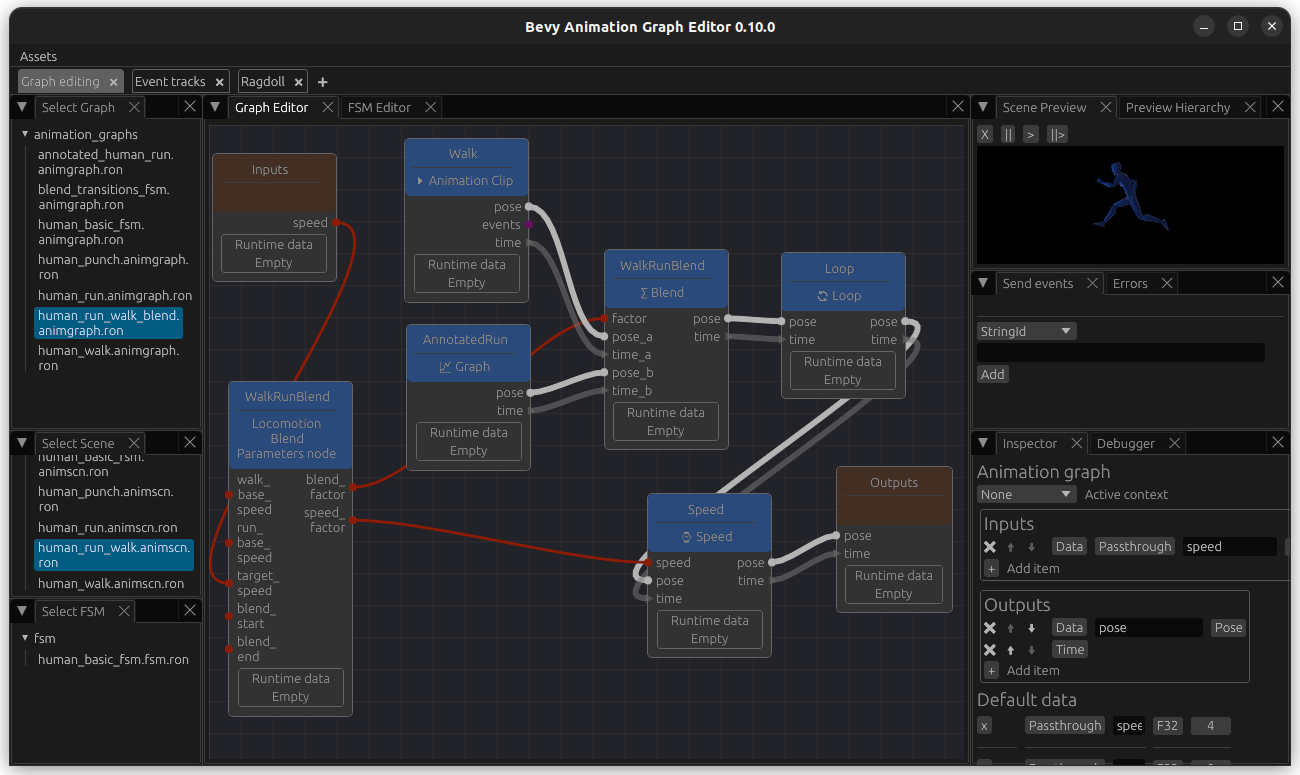
Finally, we want to be able to adjust the speed at which the animations are played at - for this, add a PlaybackSpeedNode and connect the speed to it. Now we can see that the animations are played faster or slower based on the speed, whereas before they were just blended based on it.
Add event track annotation in order to sync foot down events
While playing around you might notice the the blending is not perfect - for example, in my animations the feet are put down at slightly different timings, leading to a weird-looking blend.
This is a good use case for sync events: if you annotate your animation tracks with events, they will blend over each other based on this. So we will add foot down events for our animations. It will also be very useful when your animations do not start with the same foot.
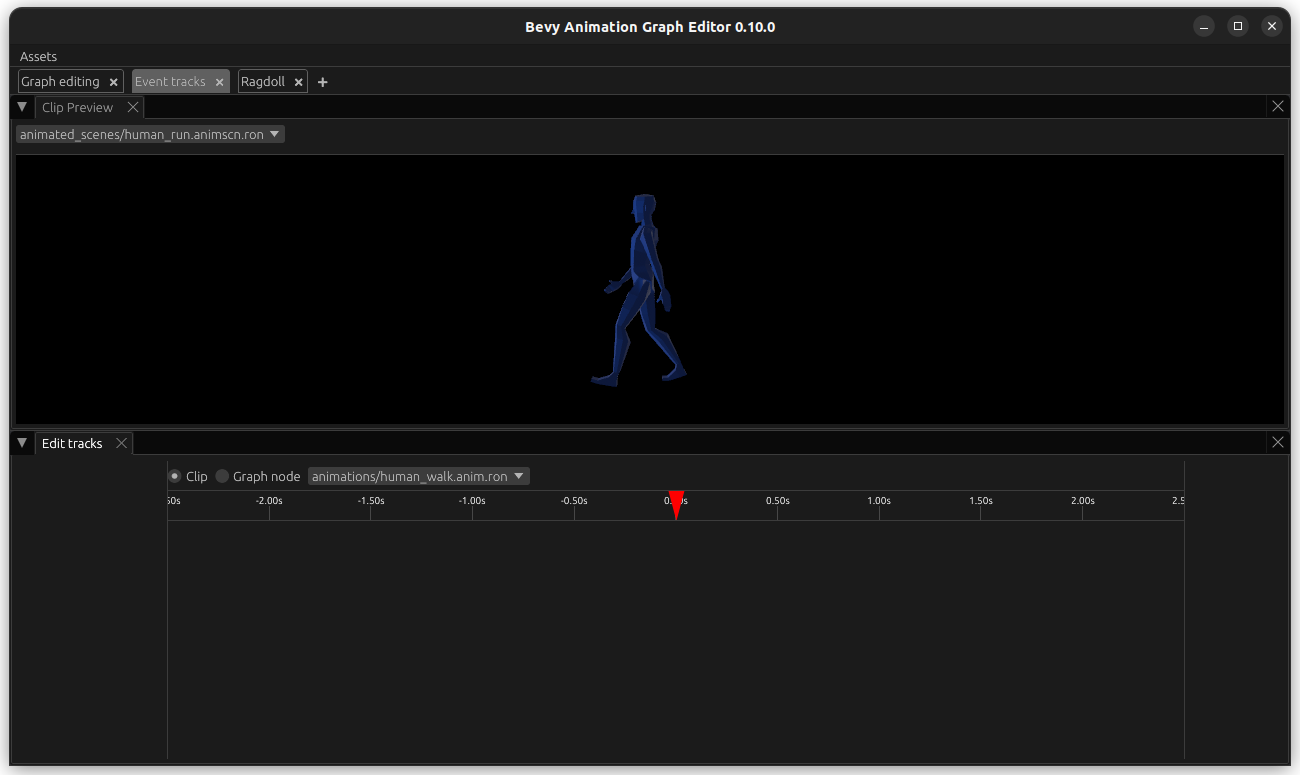
Go to the Event tracks tab. In the bottom half, keep Clip selected and open animation/human_walk.anim.ron. At the top, select animated_scenes/human_run.animscn.ron (this scene should refer to the correct skeleton, otherwise it does not matter much).
Then, hover with your mouse over the empty space underneath Edit tracks (bottom left) and right-click. Select New Track, give it a name like FootDown, for example FootDown and hit submit.
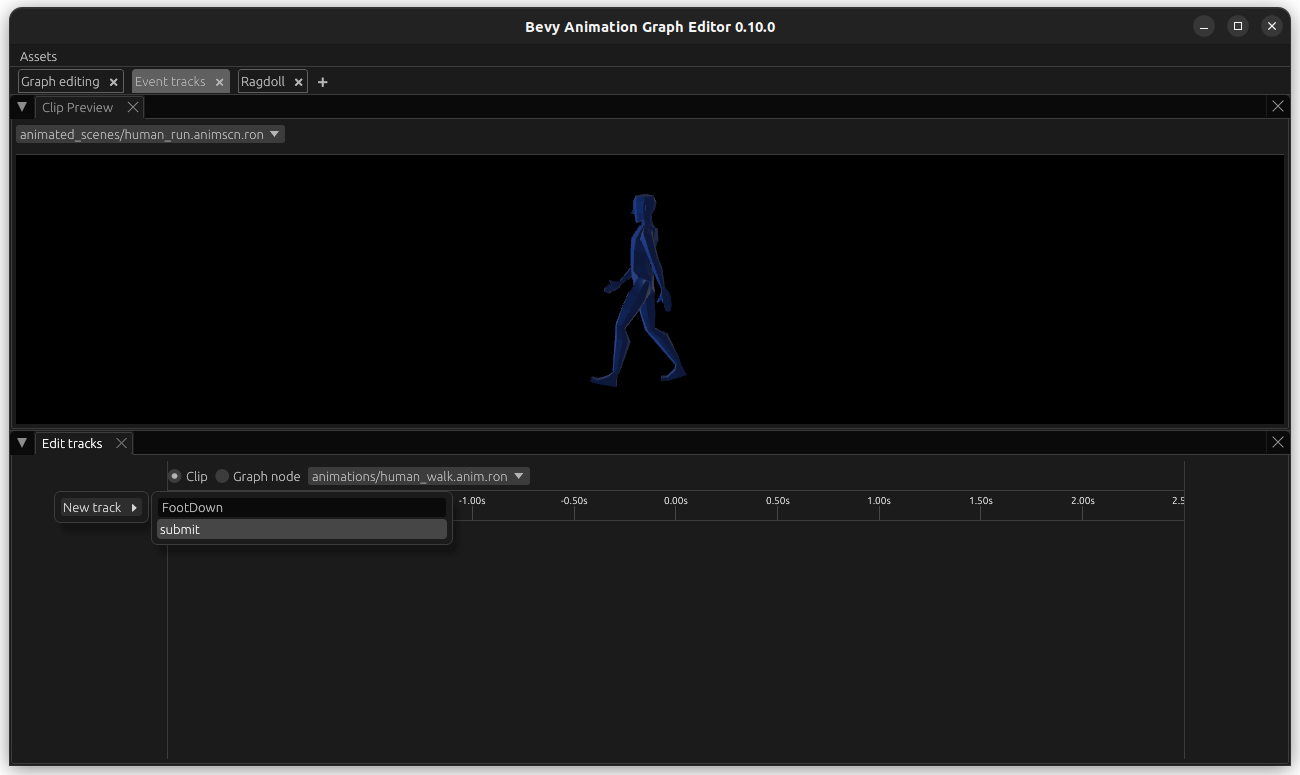
RightClick on the empty space underneath the time (in line with the track on the left), give the event a name like LeftFootDown, and update the times on when it ocurrs.

Hit submit and you should be able to see it. Do the same for RightFootDown at the correct time.

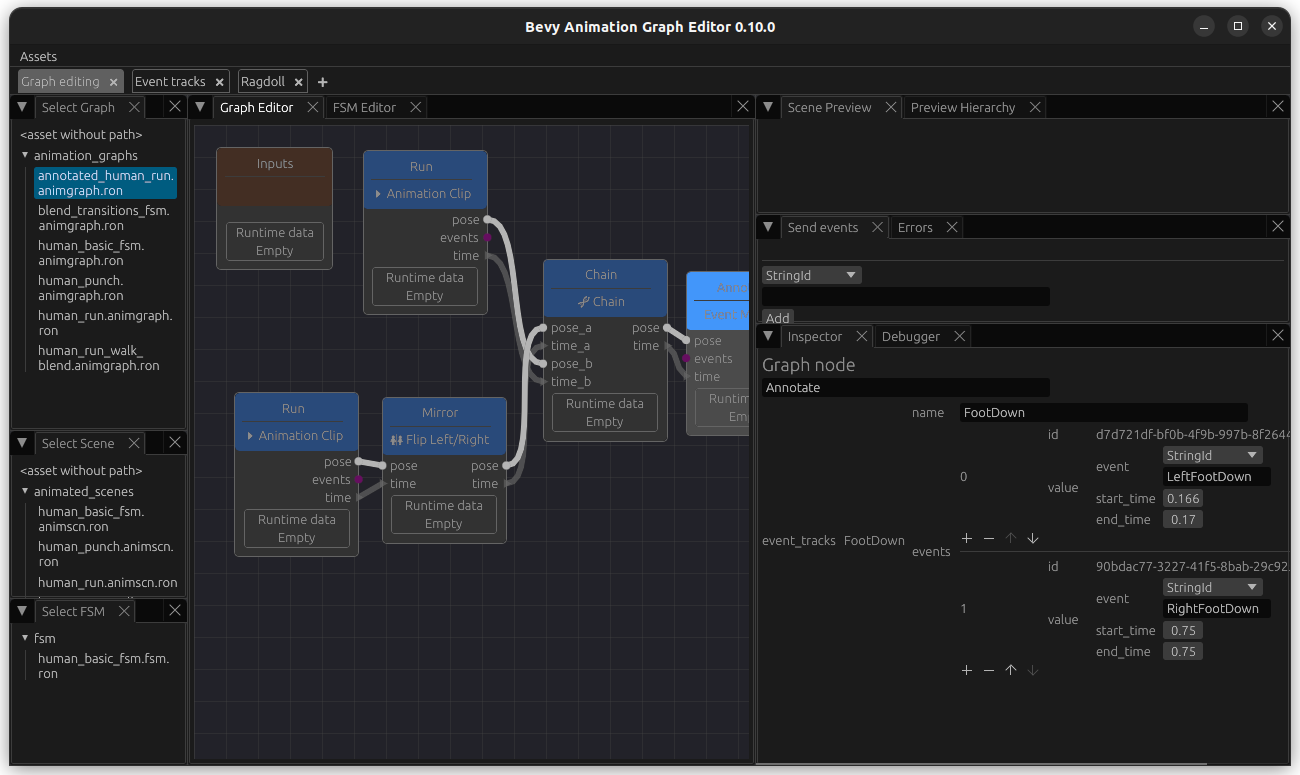
Now we want to do the same for our run animation. However, we only have half a run cycle - so we would like to base this off our annotated_human_run animation graph since that is the asset that contains the full cycle. Luckily, this is easy to achieve. Open the animation graph and add a EventMarkupNode named Annotate to it.
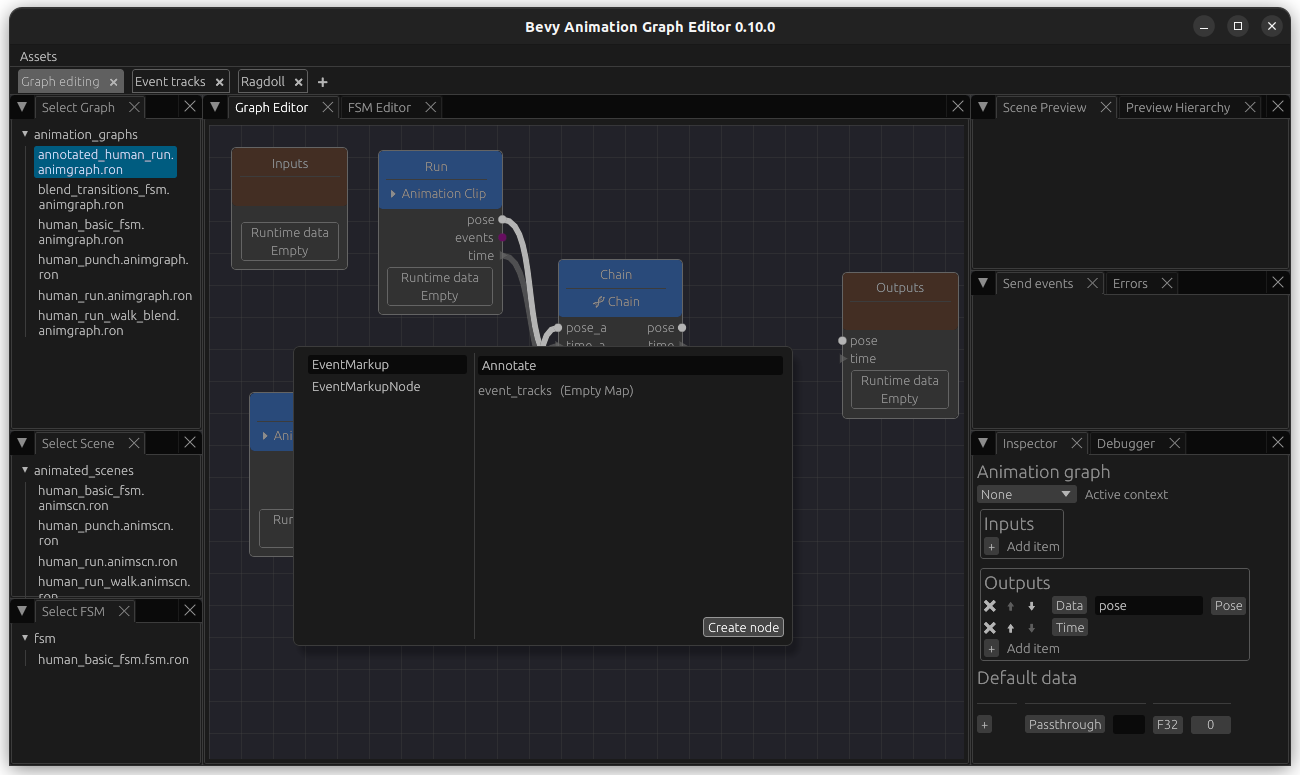
Add and output named events of type EventQueue and connect it.

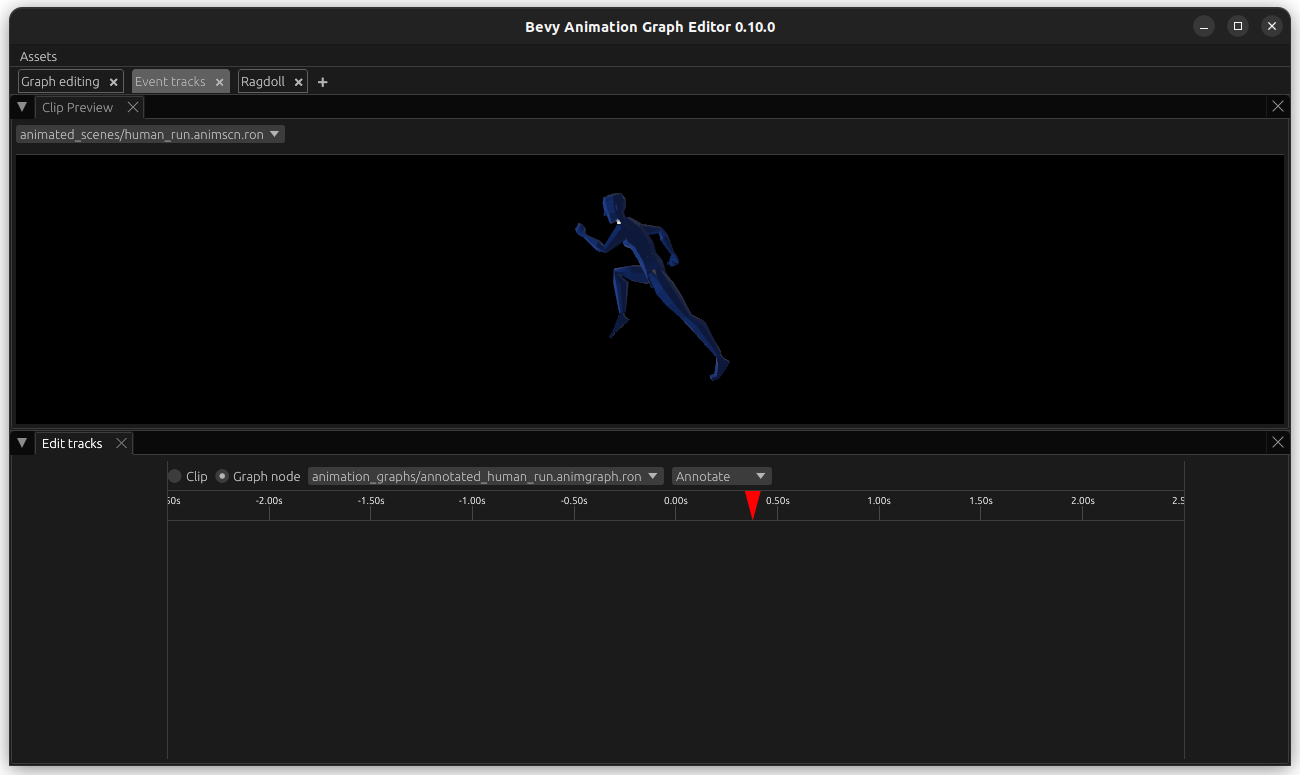
Now we go back to the Event track editor. On the bottom tab, select the type Graph Node, select our annotated_human_run graph followed by our MarkupEventNode Annotate. Select a scene with the same skeleton at the top.
Now you can create an Event track, and name it FootDown again. Add the event LeftFootDown and RightFootDown as well. It is important that the naming of both event track and events is consistent between the animations that we want to sync.

This data is also visible when you enter our annotated_human_run and select the node named Annotate for inspection - you can also edit values.
Update run-walk animation graph to sync based on events
Click on the WalkRunBlend node to edit it and change its sync_mode from Absolute to EventTrack. In the field under it, enter the name of it: FootDown. Connect the events from walk and run to the respective inputs on the BlendNode. Now this is blended based on events.
